Table of Contents
Let's be honest. You've seen those glossy photos, the ones where a fork dips into a seemingly innocent chocolate cake, and suddenly, a river of warm, dark chocolate spills out. Pure dessert theater. Maybe you've tried making one yourself, only to end up with a solid chocolate muffin or, worse, a runny mess that looks less like lava and more like sad, melted chocolate soup. It happens. The internet is awash with recipes promising molten perfection, but finding one that actually delivers, consistently, can feel like searching for a specific grain of sugar in a warehouse-sized bag.
Why Bother with Molten Lava Chocolate Cake?
The Undeniable Appeal
So, why bother with molten lava chocolate cake, anyway? It's more than just dessert; it's an experience. Think about it: a warm, rich chocolate cake exterior that gives way to a decadent, flowing center of pure melted chocolate. It's a dramatic reveal on a plate, a moment of simple indulgence that feels a little bit fancy without requiring you to spend hours in the kitchen. It hits that sweet spot between comforting cake and luxurious ganache, offering a contrast in textures and temperatures that just works. Plus, let's be real, it looks incredibly impressive when you serve it, making you look like a dessert wizard even if the process itself is surprisingly straightforward.
Gathering Your Arsenal: Ingredients for the Perfect Molten Lava Chocolate Cake Recipe
Gathering Your Arsenal: Ingredients for the Perfect Molten Lava Chocolate Cake Recipe
Chocolate: The Non-Negotiable Star
Alright, let's talk chocolate. This is not the time to cheap out. Seriously. Your molten lava chocolate cake recipe lives and dies by the quality of the chocolate you use. Those little chips from the baking aisle might be fine for cookies, but for that glorious, flowing center, you need something better. We're talking good quality semi-sweet or bittersweet chocolate bars. Look for something with around 60-70% cocoa content. Brands like Ghirardelli (the baking bars, not chips), Guittard, or even better, a good European chocolate, will make a world of difference. Chop it up finely; it melts faster and more evenly that way. Think of it as the foundation of your chocolate dreams.
Butter, Eggs, and the Usual Suspects
Beyond the chocolate, the rest of your lineup is pretty standard, but precision matters. You'll need unsalted butter. Why unsalted? So you control the salt level yourself. Melt it gently with your chopped chocolate. Eggs are crucial; they provide structure and richness. You'll likely be using whole eggs and maybe an extra yolk for added richness – check your specific molten lava chocolate cake recipe, but this is common. Sugar, just enough to sweeten without overpowering the chocolate. And a small amount of flour – this is where things get tricky. Too much flour, and you've got a solid cake. Too little, and it collapses. The flour provides just enough structure around the edges to hold that molten core in place.
- High-quality Semi-Sweet or Bittersweet Chocolate (60-70% cocoa)
- Unsalted Butter
- Large Eggs (at room temperature is best)
- Granulated Sugar
- All-Purpose Flour
- Good Quality Cocoa Powder (Dutch-processed often gives a richer color)
- Pinch of Salt (enhances chocolate flavor)
The Supporting Cast: Cocoa and Temperature
Don't forget the cocoa powder! It's often used to dust the ramekins after buttering them. This prevents sticking and adds another layer of chocolate flavor. Use good quality cocoa here too, not the pale, dusty stuff. Dutch-processed cocoa tends to give a deeper color and smoother flavor. Also, pay attention to ingredient temperature. Eggs at room temperature incorporate better into the batter, leading to a smoother texture. It might sound fussy, but these small details genuinely impact the final outcome of your molten lava chocolate cake recipe attempt.
Crafting the Magic: StepbyStep Molten Lava Chocolate Cake Recipe Guide

Crafting the Magic: StepbyStep Molten Lava Chocolate Cake Recipe Guide
Melting Chocolate and Butter: The Foundation
you've got your good chocolate and butter ready. The first step in this molten lava chocolate cake recipe is getting these two together in a happy, melted state. Use a double boiler setup if you have one – a heatproof bowl set over a pot of simmering water – it's the gentlest way to melt chocolate without scorching it. No double boiler? A microwave works, but you have to be careful. Heat in short bursts, like 30 seconds, stir, heat again, stir, until it's smooth. Don't just nuke it until it looks done; you'll regret it. Once melted, stir them together until they are completely smooth and glossy. Let this mixture cool slightly while you move on to the next part.
Whipping Eggs and Sugar: Building the Aeration
This next bit is crucial for that light cake texture around the molten center. Grab your eggs and sugar. You need to beat them together until they are thick and pale yellow. This isn't just a quick whisk; you're aiming for a ribbon stage. That means when you lift the whisk, the mixture falls back into the bowl in a ribbon that holds its shape for a few seconds before dissolving. This incorporates air, which helps the cake rise and keeps it from being too dense. It usually takes a few minutes with an electric mixer, or a serious arm workout by hand. Don't skimp on this step; it makes a real difference in your molten lava chocolate cake outcome.
- Chop chocolate finely for even melting.
- Melt chocolate and butter gently (double boiler or careful microwaving).
- Stir until smooth and glossy.
- Beat eggs and sugar until thick and pale (ribbon stage).
- Ensure melted chocolate mixture cools slightly before combining.
Troubleshooting & Serving Your Molten Lava Chocolate Cake Creations
Troubleshooting & Serving Your Molten Lava Chocolate Cake Creations
Troubleshooting & Serving Your Molten Lava Chocolate Cake Creations
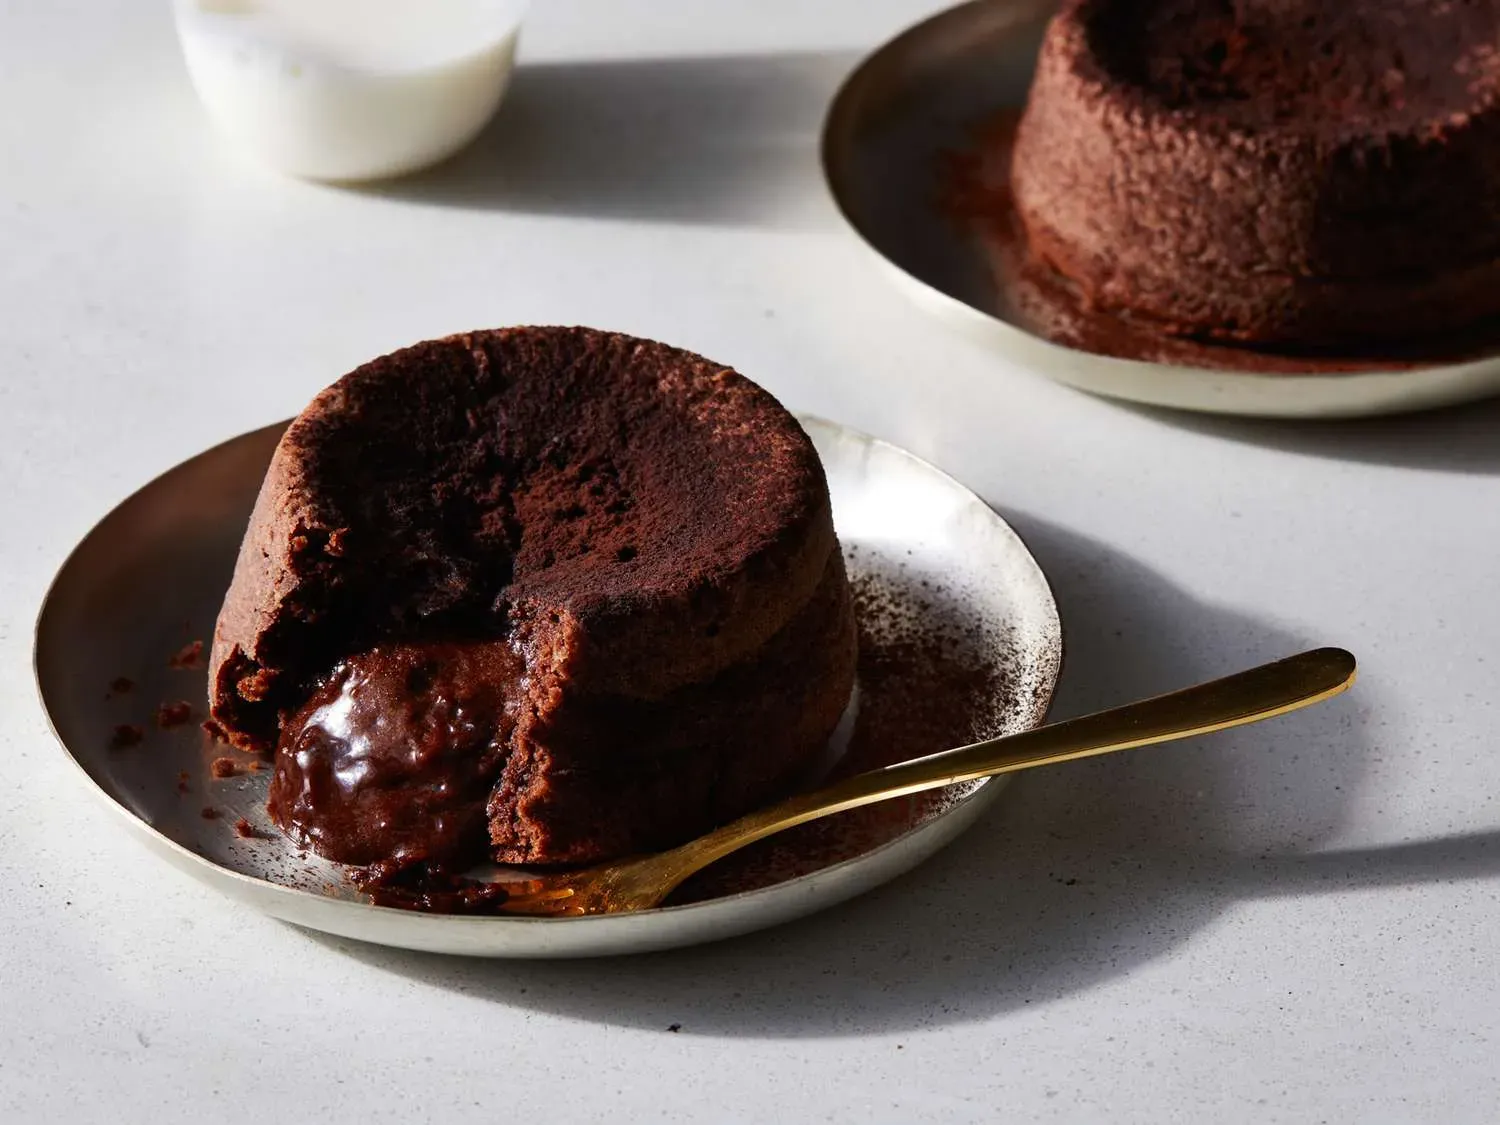
so you've followed the steps, the house smells amazing, and the timer just went off. The moment of truth for your molten lava chocolate cake recipe attempt is nigh. What happens if they don't look quite right? If the center isn't fully molten, they likely need another minute or two in the oven. If they collapse entirely when you try to turn them out, they were probably underbaked or didn't rest long enough in the ramekin after baking. Don't panic. Even a slightly less-than-perfect lava cake still tastes like warm chocolate goodness. Consider it a learning experience for the next batch.
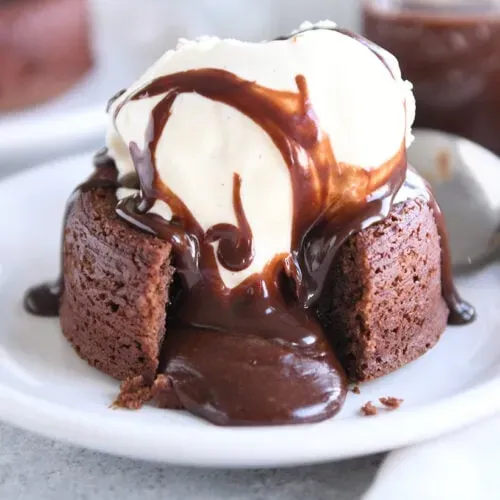
Once they're out of the oven and have rested for that critical couple of minutes (seriously, don't skip the rest!), run a knife around the edge of the ramekin and invert it onto a plate. If all goes well, you should see that beautiful, slightly jiggly center. Serving is simple and classic for this molten lava chocolate cake recipe favorite. A scoop of vanilla bean ice cream is non-negotiable in my book – the contrast of hot and cold is divine. A dusting of powdered sugar is elegant, or a drizzle of raspberry sauce adds a nice tart counterpoint. Don't overthink it; the cake itself is the star.
- Underbaked center? Bake for another 1-2 minutes.
- Cake collapsed? Likely underbaked or didn't rest enough.
- Rest cakes for 2-3 minutes before inverting.
- Serve warm for best results.
- Classic pairings: Vanilla ice cream, powdered sugar, fresh berries.
You Did It. Now Eat It.
So there you have it. Not some mystical, impossible dessert requiring a pact with a pastry demon, but a straightforward molten lava chocolate cake recipe. You mixed, you baked, you resisted the urge to poke it prematurely (hopefully). The result? A warm, rich cake with that essential, flowing chocolate heart. It's not complicated; it just demands a bit of attention to detail – the right temperature, the right timing. Now stop staring at it like it's going to bite you. Grab a spoon, maybe some ice cream if you're feeling fancy, and enjoy the payoff. You earned it.