Table of Contents
Forget boring sheet cakes! Want to create a personalized dessert that’s both stunning and delicious? Then you absolutely need a killer letter cookie cake recipe. This trendy treat is taking over dessert tables, and the best part? You don’t need any fancy, hard-to-store cake pans. We're diving into the world of free-form baking, where your imagination is the only limit. This isn't just another cake recipe; it's a guide to creating edible art. We'll walk you through everything, from mixing the perfect dough to mastering the trimming technique that gives your cake its sharp, clean lines. Then, unleash your inner artist with decorating tips that will make your creation Instagram-worthy. Whether you're celebrating a birthday, anniversary, or just want to impress your friends, this guide will give you the confidence to bake a show-stopping letter cookie cake that tastes as good as it looks. Ready to get baking?
Why a Letter Cookie Cake Recipe is Your Next Baking Obsession
Why a Letter Cookie Cake Recipe is Your Next Baking Obsession
Unleash Your Inner Cake Artist
let's be real: baking the same old round cake can get a little…predictable. But a letter cookie cake? That's a blank canvas begging for your creative touch. It's not just baking; it's a personalized edible masterpiece. Think of the possibilities! Initials for a newly engaged couple, a big "30" for a milestone birthday, or even a fun "Congrats Grad!" The shape alone makes it special, way more interesting than your average cake.
Plus, ditching the traditional cake pan is seriously liberating. No more struggling to get that perfect release or dealing with uneven baking. With a letter cookie cake, you're in control of the size and shape, adapting it to fit your celebration perfectly. It's like playing with edible clay, but the results are far more delicious.
The Sweet Taste of Baking Freedom
Let's talk about the fun factor. Decorating a letter cookie cake is seriously therapeutic. Forget complicated frosting techniques; we're talking dollops of buttercream, piles of fresh fruit, colorful candies, and anything else that sparks joy. It's a fantastic activity to do with kids, friends, or even just as a relaxing solo project. Turn on some music, gather your supplies, and let your creativity flow. Trust me, the process is just as rewarding as the final product.
And the best part? It tastes amazing! A soft, chewy cookie base topped with creamy frosting and your favorite treats? It's a textural and flavor explosion that's guaranteed to impress. Plus, because it's a cookie, it's easy to slice and serve, making it perfect for parties and gatherings. So, are you ready to ditch the ordinary and embrace the extraordinary? Let's get baking!
Essential Ingredients for Your Letter Cookie Cake Recipe
Essential Ingredients for Your Letter Cookie Cake Recipe
Cookie Dough Essentials
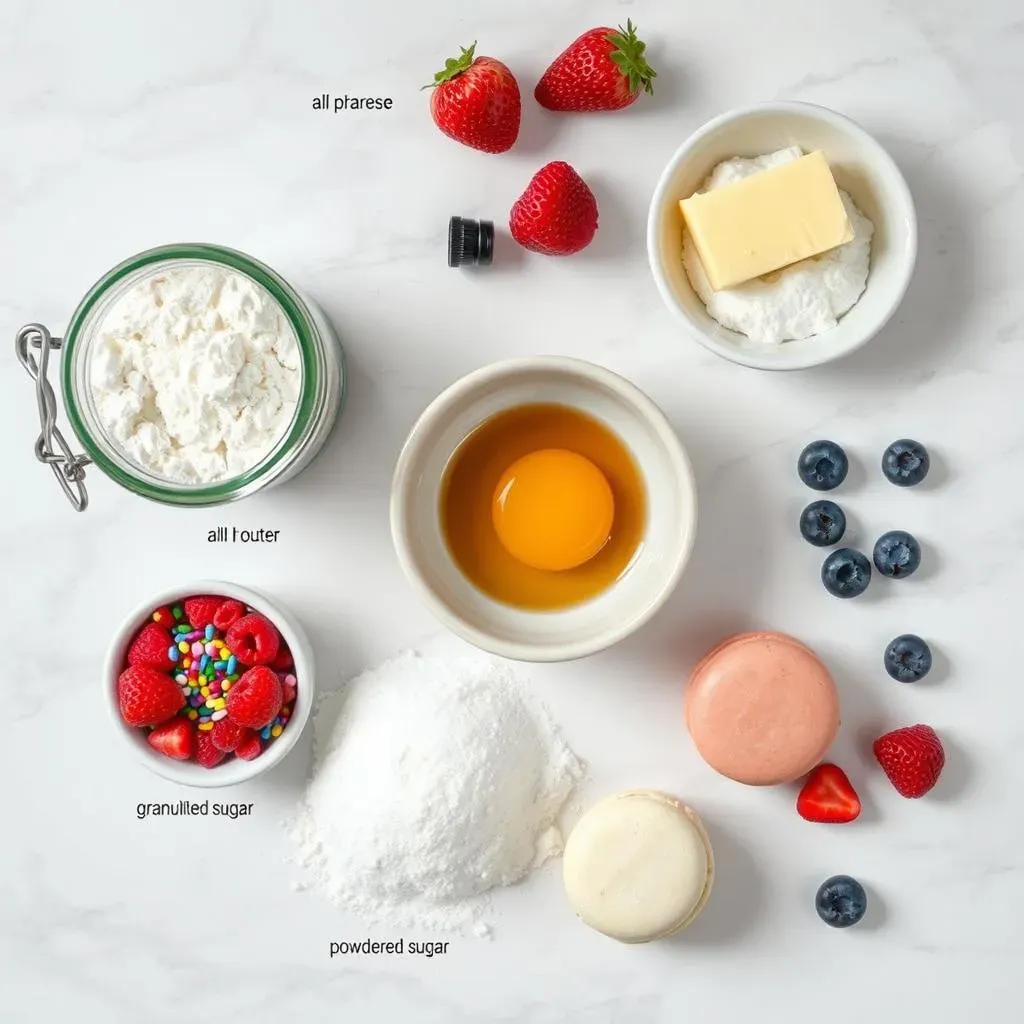
Alright, let's break down what you'll need for the cookie base. First up, the usual suspects: all-purpose flour, sugar (granulated or caster sugar works great), unsalted butter (softened, not melted!), an egg (or flax egg for a vegan version), and a touch of vanilla extract. But here's where you can get creative. Want a richer flavor? Brown butter is your friend. Craving chocolate? Add cocoa powder to the dry ingredients. A little almond extract can also add a sophisticated twist. Don't forget a pinch of salt to balance the sweetness!
For the flour, stick to all-purpose unless you're feeling adventurous. Pastry flour will give you a more tender cookie, but it can be a bit too delicate for a cake base. Also, make sure your baking powder is fresh! Stale baking powder will result in a flat, dense cookie, and nobody wants that. I always give mine the "hot water test" – a teaspoon in hot water should bubble vigorously. If it doesn't, it's time for a new container.
Ingredient | Why it Matters | Possible Substitutions |
|---|---|---|
All-Purpose Flour | Provides structure | Gluten-free blend (with xanthan gum) |
Unsalted Butter | Adds flavor and tenderness | Vegan butter, coconut oil (for a different texture) |
Sugar | Sweetness and moisture | Brown sugar (for a molasses flavor), honey (adjust liquid accordingly) |
Egg | Binds ingredients | Flax egg (1 tbsp flaxseed meal + 3 tbsp water, let sit for 5 minutes) |
Frosting and Decoration Must-Haves
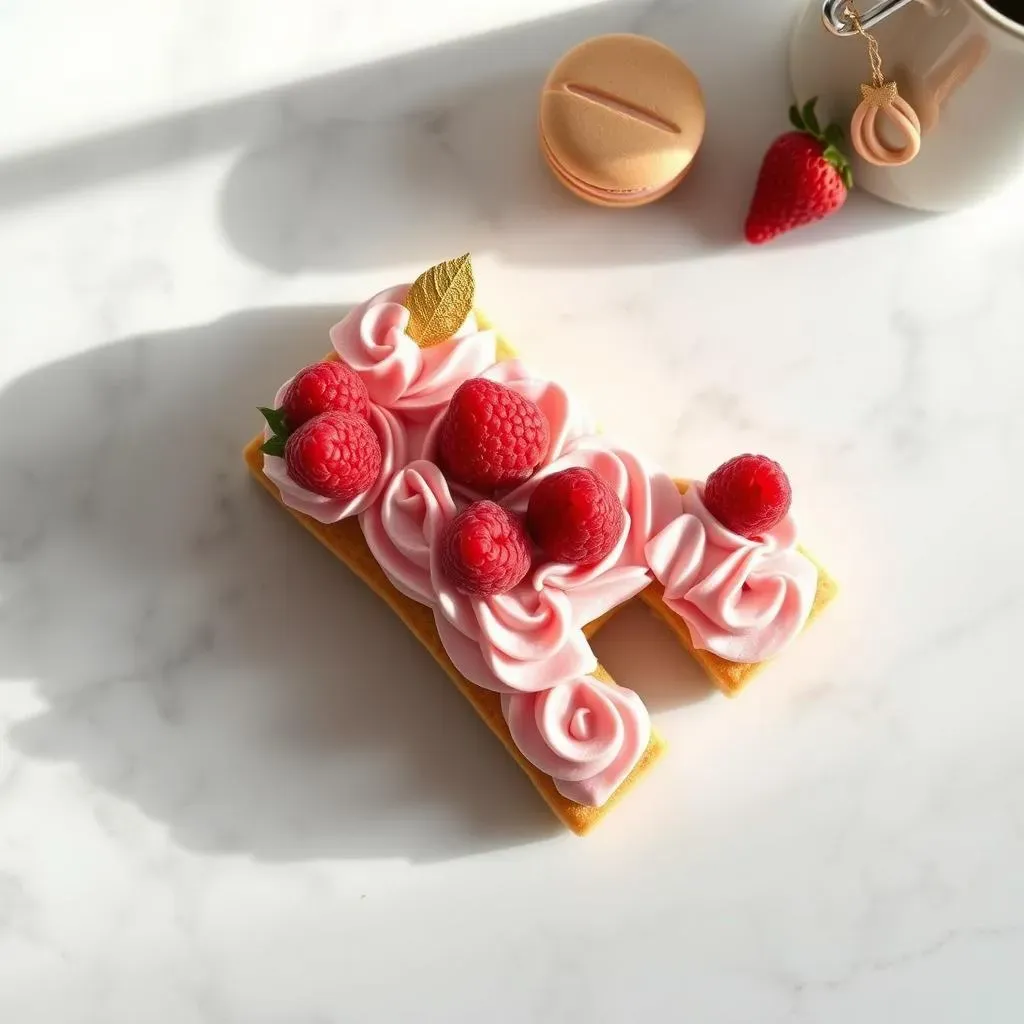
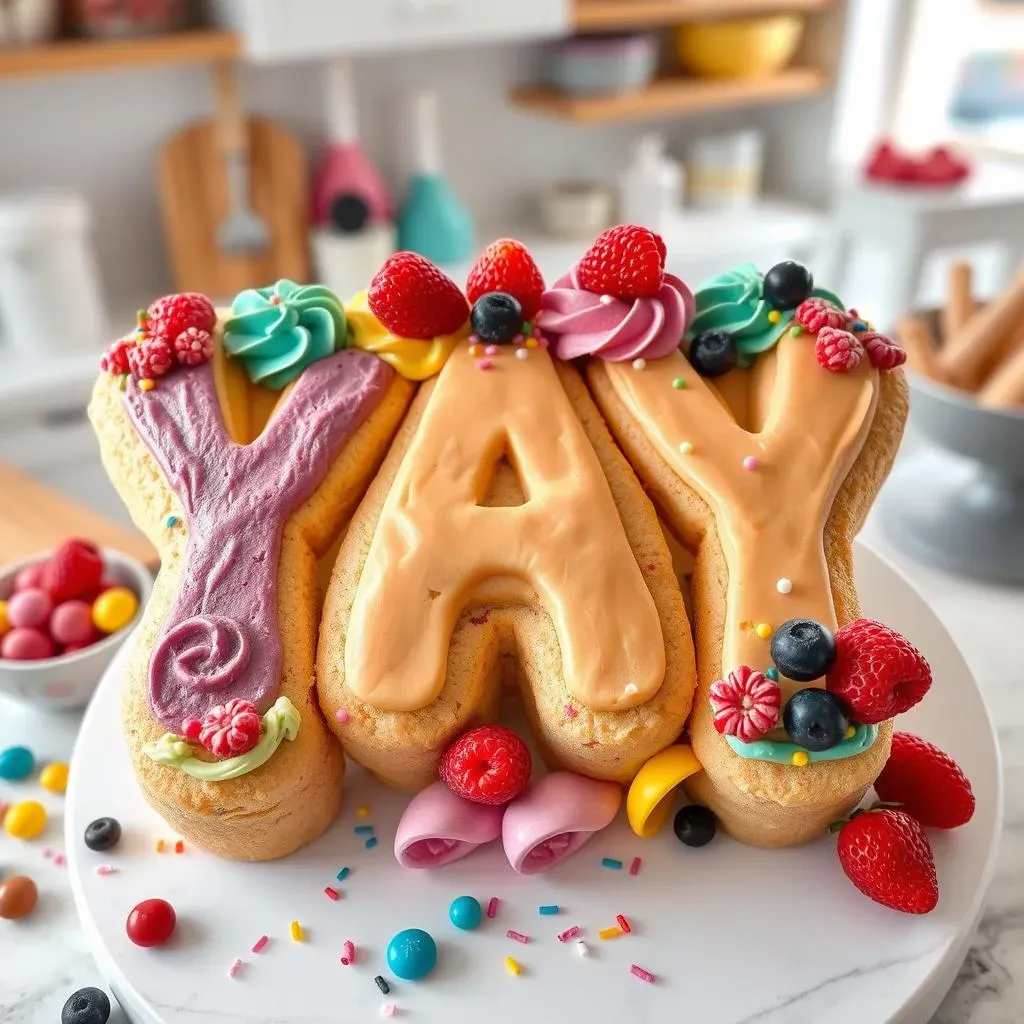
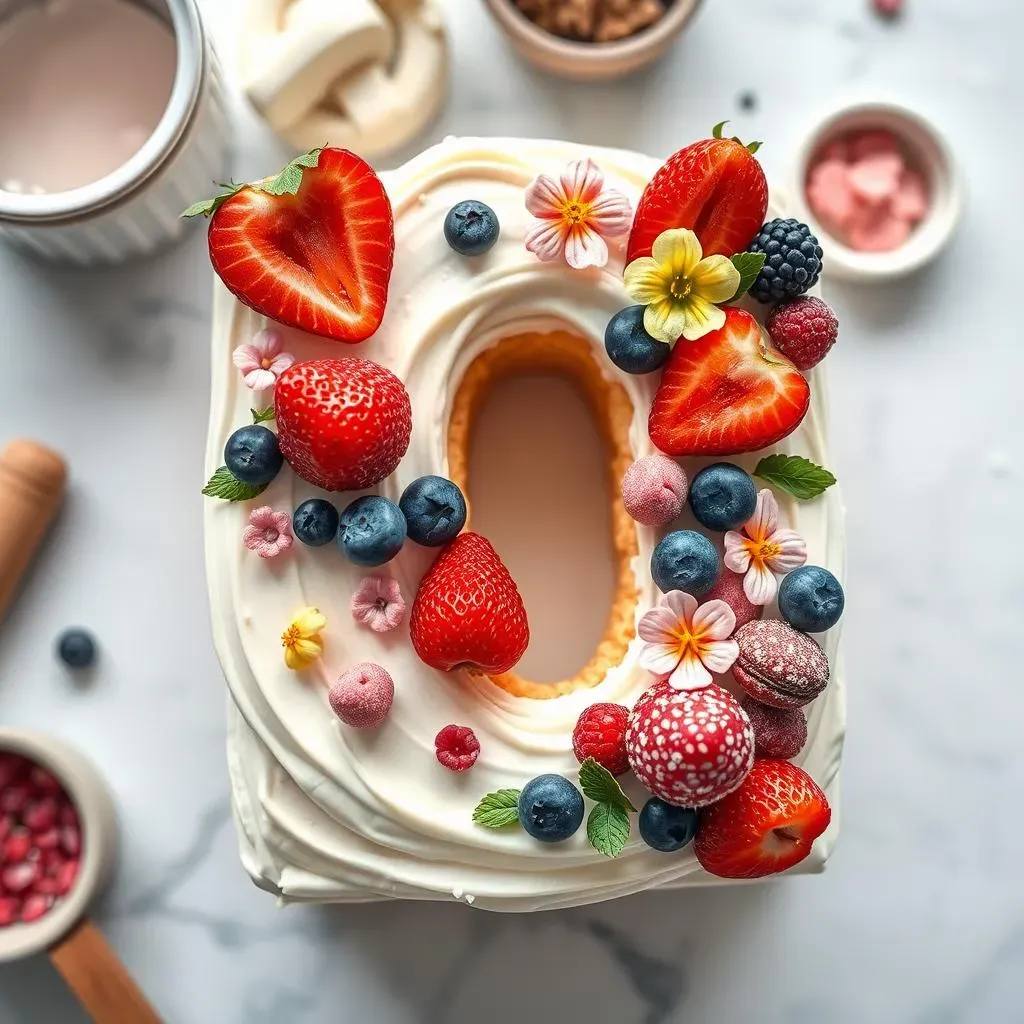
Now, for the fun part: frosting and decorations! Classic buttercream is always a winner – it's easy to make and takes on flavors beautifully. You'll need powdered sugar, softened butter, milk or cream, and vanilla extract. But don't stop there! A little lemon zest, a spoonful of Nutella, or even a dash of coffee extract can take your buttercream to the next level. As for decorations, the sky's the limit. Fresh fruit, macarons, sprinkles, chocolate shavings, edible flowers…go wild!
When choosing your decorations, think about color and texture. A mix of smooth and crunchy, bright and pastel, will make your cake visually appealing. And don't be afraid to get creative with the placement. Arrange your decorations in a symmetrical pattern, or go for a more free-flowing, organic look. There are no rules here, just have fun and let your personality shine through!
Letter Cookie Cake Recipe: StepbyStep Baking and Trimming
Letter Cookie Cake Recipe: StepbyStep Baking and Trimming
Mixing and Shaping the Dough
Alright, future cookie cake artist, let's get our hands dirty! First, cream together your softened butter and sugar until light and fluffy. This is where a stand mixer comes in handy, but a good old-fashioned hand mixer (or even a wooden spoon and some elbow grease) will do the trick. Next, beat in your egg and vanilla extract until well combined. In a separate bowl, whisk together your dry ingredients: flour, baking powder, and salt. Gradually add the dry ingredients to the wet ingredients, mixing until just combined. Be careful not to overmix, or you'll end up with a tough cookie.
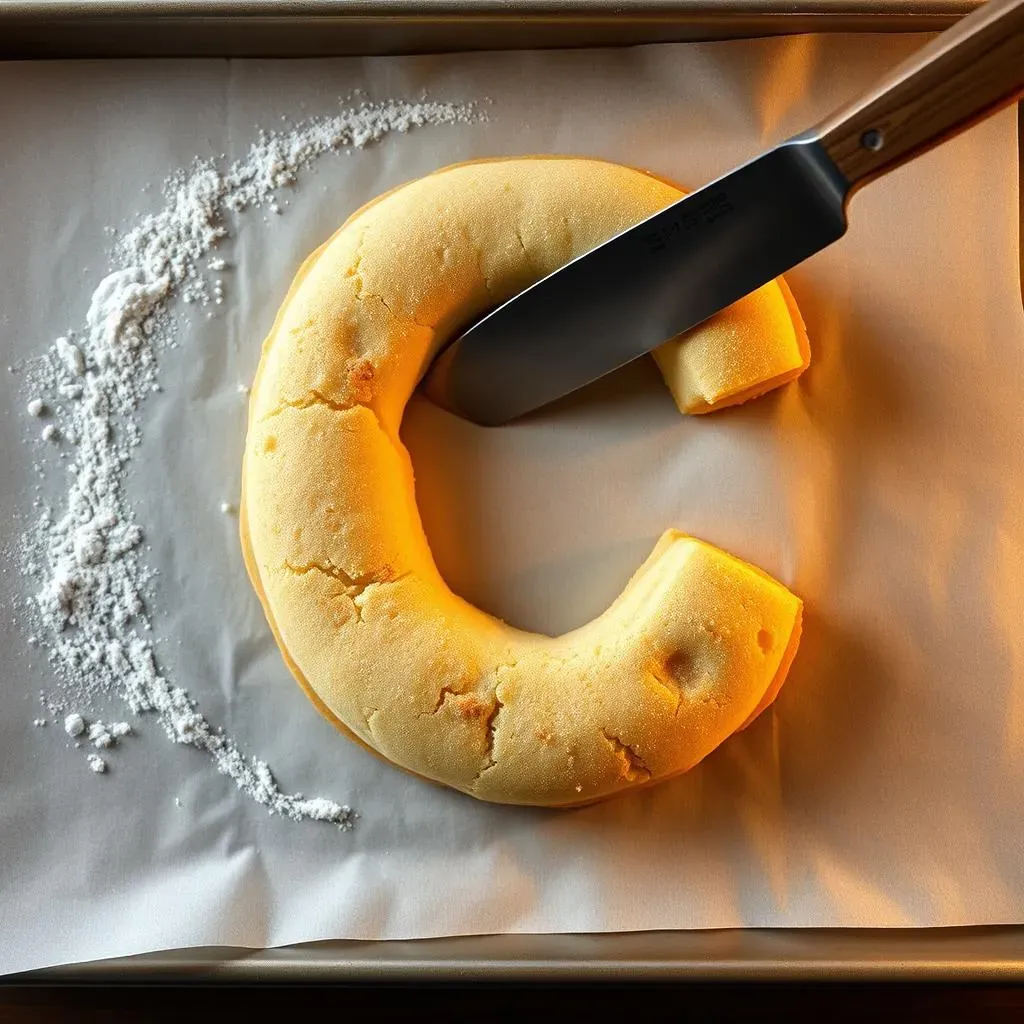
Now for the fun part: shaping the dough! On a large sheet of parchment paper, use your hands to form the dough into your desired letter or number. Don't worry about making it perfect at this stage; we'll be trimming it later. Aim for a thickness of about ¼ to ½ inch. If the dough is too sticky to work with, chill it in the fridge for 15-20 minutes. Once you're happy with the shape, transfer the parchment paper with the dough onto a baking sheet.
Pro Tip: For intricate shapes, consider using a stencil. Print out your desired letter or number, place it under the parchment paper, and trace around it with a knife or pizza cutter.
Baking and Trimming for Perfection
Pop that masterpiece into a preheated oven at 350°F (175°C) and bake for 12-15 minutes, or until the edges are golden brown. Keep a close eye on it, as baking times can vary depending on your oven. Once it's out of the oven, let the cookie cool slightly on the baking sheet for a few minutes. This is crucial for the next step: trimming!
While the cookie is still warm and pliable (but not too hot to handle!), use a sharp knife or pizza cutter to trim the edges and create clean, sharp lines. This is where you can really refine the shape and make it look professional. Don't be afraid to be generous with the trimming; you can always snack on the scraps later! Once you're happy with the shape, let the cookie cool completely on the baking sheet before frosting.
Safety First: Always use caution when working with sharp knives, especially when the cookie is still warm. Take your time and focus on precision.
Step | Description | Tips |
|---|---|---|
Mixing Dough | Combine wet and dry ingredients | Don't overmix |
Shaping Dough | Form letter/number on parchment paper | Chill if too sticky |
Baking | Bake at 350°F until golden | Watch closely, baking times vary |
Trimming | Cut edges while warm for clean lines | Use sharp knife, be careful |
Decorating Your Letter Cookie Cake: Tips, Tricks, and FAQs
Decorating Your Letter Cookie Cake: Tips, Tricks, and FAQs
Buttercream Basics: Achieving Frosting Perfection
Alright, let's talk frosting. Buttercream is the classic choice for a reason: it's versatile, delicious, and relatively easy to make. But there are a few key things to keep in mind for frosting success. First, make sure your butter is properly softened – not melted, but soft enough that you can easily press a finger into it. This will ensure a smooth, creamy frosting. Second, don't add all the powdered sugar at once! Gradually add it in batches, mixing well after each addition. This will prevent a powdery, clumpy frosting. And finally, don't be afraid to experiment with flavors! A little vanilla extract is always a good start, but you can also add lemon zest, cocoa powder, or even a pinch of salt to enhance the flavor.
When it comes to applying the frosting, there are a few different techniques you can use. The most common is to pipe dollops of frosting onto the cookie cake and then gently spread them out with a spatula or knife. This creates a rustic, textured look. Another option is to use a piping bag with a decorative tip to create more intricate designs. If you're feeling ambitious, you can even try creating a smooth, even layer of frosting using a technique called "crusting." This involves applying a thin layer of frosting, letting it set for a few minutes, and then smoothing it out with a warm spatula.
Frosting Issue | Possible Cause | Solution |
|---|---|---|
Grainy Frosting | Butter not softened enough, too much powdered sugar | Ensure butter is soft, add milk/cream to smooth |
Too Sweet | Too much powdered sugar | Add a pinch of salt or a squeeze of lemon juice |
Not Stiff Enough | Too much liquid | Add more powdered sugar, a little at a time |
Creative Decoration Ideas: Beyond the Basics
now for the really fun part: decorations! This is where you can let your personality shine. Fresh fruit is always a beautiful and delicious option. Berries, sliced citrus, and even edible flowers can add a pop of color and flavor. Macarons are another popular choice, adding a touch of elegance and sophistication. But don't be afraid to get creative with other candies and treats. Sprinkles, chocolate shavings, mini cookies, and even gummy bears can add a playful touch.
When arranging your decorations, think about balance and symmetry. You can create a symmetrical pattern by placing the same decorations on opposite sides of the cake. Or, you can go for a more organic, free-flowing look by scattering the decorations randomly. Another option is to create a focal point by concentrating the decorations in one area of the cake. No matter what you choose, just have fun and let your creativity guide you!
Pro Tip: Use a toothpick or skewer to help you arrange small decorations, especially if your frosting is still soft. This will prevent you from smudging the frosting or accidentally poking your fingers into the cake.
Letter Cookie Cake FAQs: Your Burning Questions Answered
Got questions? We've got answers! One of the most common questions is: "How far in advance can I make the cookie cake?" The answer is, it depends. The cookie base can be made up to 2 days in advance and stored in an airtight container at room temperature. The frosting can also be made a day in advance and stored in the refrigerator. However, it's best to assemble and decorate the cake on the same day you plan to serve it, as the frosting can soften the cookie over time.
Another common question is: "Can I freeze the cookie cake?" While you can freeze the cookie base, it's not recommended to freeze the entire decorated cake, as the frosting and decorations can become soggy and lose their texture. If you do need to freeze the cookie base, wrap it tightly in plastic wrap and then in foil. It can be stored in the freezer for up to 2 months. Thaw it completely at room temperature before frosting and decorating.
Letter Cookie Cake Recipe: Your Sweet Success Story
So, you've got the knowledge, the inspiration, and the recipe. Now it's time to transform your kitchen into a cookie cake studio! This letter cookie cake recipe isn't just about baking; it's about creating something personal, memorable, and utterly delicious. Don't be afraid to experiment with flavors, frosting, and decorations to make it your own. Whether you're a seasoned baker or just starting out, the joy of presenting a homemade masterpiece is a reward in itself. Now, go forth and bake some happiness!