Table of Contents
Ever dreamed of creating a show-stopping dessert? A magnificent layer chocolate cake with frosting that makes everyone swoon? Well, you're in the right place! I'm not talking about some dry, crumbly cake with a gritty frosting that tastes like it came from a can. We're going for a moist, decadent chocolate cake, layered high with a silky smooth chocolate frosting. This isn't just a recipe; it's a journey into the delicious world of baking. In this article, I'll walk you through every step, from understanding the key ingredients that make our cake so special to mastering the art of frosting and assembling the layers. You'll learn how to build a stable, delicious cake and get all the tips and tricks for a perfect finish. So, grab your apron, preheat your oven, and let's get baking a layer chocolate cake with frosting that'll impress even the harshest critic – probably even your grandma!
The Magic of a Moist Chocolate Cake: Building the Layers
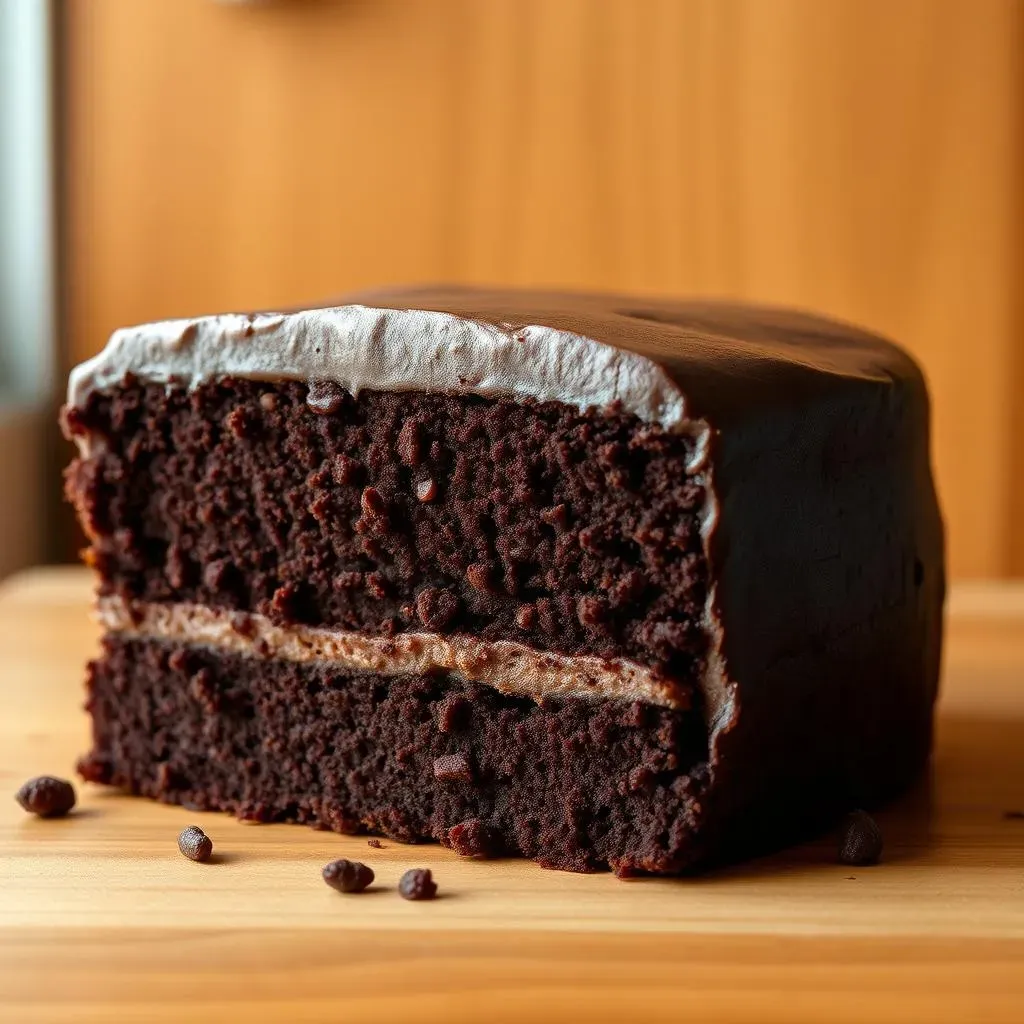
The Magic of a Moist Chocolate Cake: Building the Layers
The Foundation: Understanding the Ingredients
Okay, so you want a cake that's not just chocolatey, but also super moist? It all starts with the right ingredients and knowing what they do. Think of it like building a house; you need a solid foundation. For chocolate cake, that means things like flour (the structure), sugar (sweetness and moisture), eggs (binding and richness), and cocoa powder (the chocolatey goodness, of course). But the real secret weapons? Buttermilk or sour cream and hot coffee. The acid in the buttermilk tenderizes the gluten in the flour, making the cake softer, and the hot coffee enhances the chocolate flavor. Don't worry, it won't taste like coffee! It's more of a secret agent that makes the chocolate even more chocolatey.
And don’t even think about skipping the fat! Butter or oil is key for a tender crumb. A good rule of thumb is to use oil for a super moist cake. Butter will give you a richer flavor, but it can dry out a little faster. It’s a tough choice, I know, but I usually prefer oil for the moistest results. Also, make sure your ingredients are at room temperature. This helps them combine more easily and evenly, which is super important for a smooth batter and a cake that bakes evenly. Cold ingredients can lead to a dense, uneven texture, and nobody wants that. So, plan ahead and take your eggs and butter out of the fridge before you start.
Ingredient | Why it's Important |
|---|---|
Flour | Provides structure |
Sugar | Sweetness and moisture |
Eggs | Binding and richness |
Cocoa Powder | Chocolate flavor |
Buttermilk/Sour Cream | Tenderizes gluten for softer texture |
Hot Coffee | Enhances chocolate flavor |
Oil/Butter | Moisture and tenderness |
The Mixing Method: It's All About Technique
Now that you've got your ingredients, it's time to mix them up! But hold on; don't just dump everything into a bowl and start stirring like crazy. The order you add the ingredients and how you mix them matters. Start by creaming together the butter (or oil) and sugar until it's light and fluffy. This incorporates air into the batter, which helps make the cake light and airy. Next, add the eggs one at a time, mixing well after each addition. Then, in a separate bowl, whisk together the dry ingredients (flour, cocoa powder, baking soda, baking powder, and salt). Now, alternate adding the dry ingredients and the wet ingredients (buttermilk and vanilla extract) to the butter mixture, starting and ending with the dry ingredients. This helps to prevent overmixing, which can lead to a tough cake. Mix until just combined, and then gently fold in the hot coffee. Don't overmix! Overmixing can develop the gluten in the flour and make your cake tough. You're aiming for a smooth batter, not a workout.
And remember, always scrape down the sides of the bowl while mixing. This ensures that all the ingredients are evenly incorporated. It's like when you're trying to make sure you get every last bit of frosting off the spatula – you don't want any pockets of unmixed batter lurking at the bottom of the bowl! Once you have your batter all mixed, pour it into your prepared cake pans and bake. And remember to not open the oven while baking, it will drop the temperature and will ruin the cake.
“The secret of great cooking is, first, having great love for it.” – James Beard
Crafting the Perfect Chocolate Frosting: Silky Smooth Goodness
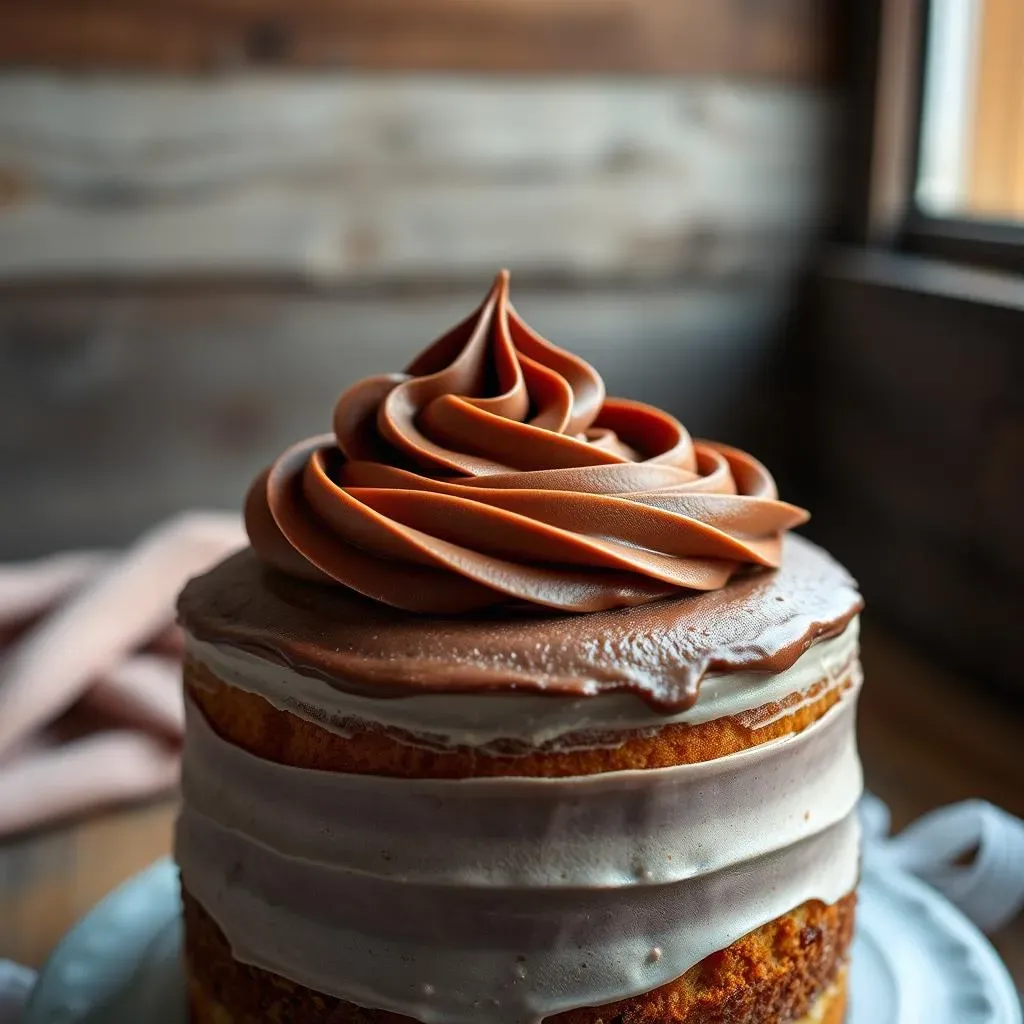
Crafting the Perfect Chocolate Frosting: Silky Smooth Goodness
The Buttercream Base: It's All About the Fat
Alright, so you've got your amazing cake layers ready, now it's time for the frosting! And not just any frosting, we're talking about a luscious, silky smooth chocolate buttercream. The foundation of any great buttercream is, well, butter, obviously! But the type of butter and the way you treat it really matters. You want to use unsalted butter, and it needs to be at room temperature. If it's too cold, you'll end up with a lumpy frosting. If it's too warm, it'll be greasy and won't hold its shape. It's a Goldilocks situation, you need it to be just right! Also, don't be afraid to use a good quality butter. It will make a difference in the taste and texture of your frosting.
You'll also need powdered sugar (also known as confectioners' sugar), which will make the frosting sweet and give it structure. And of course, cocoa powder! The cocoa powder will give the frosting the intense chocolate flavor. For a more intense flavor, you can use a dark cocoa powder. Don't just dump it all in at once! Start with a smaller amount and add more until you get the chocolate intensity you want. And lastly, a little bit of milk or cream to bring everything together. The fat in the milk or cream helps to make the frosting extra smooth and creamy. Start with a tablespoon at a time and add more until you get the perfect consistency.
Ingredient | Why it's Important |
|---|---|
Unsalted Butter (Room Temp) | Base of the frosting, richness and structure |
Powdered Sugar | Sweetness and structure |
Cocoa Powder | Chocolate flavor |
Milk or Cream | Smoothness and consistency |
The Mixing Technique: Whipping It Good
Okay, once you've gathered all your ingredients for the frosting, it's time to mix them together! The most important thing when you're making buttercream is to whip the butter first. You need to whip it until it's light and fluffy, which usually takes about 3-5 minutes. Don't rush this step! It's what makes the frosting light and airy. Then, gradually add the powdered sugar, mixing on low speed to prevent a sugar cloud explosion in your kitchen. Seriously, it's like a snowstorm of sugar if you go too fast! Once the powdered sugar is incorporated, add the cocoa powder and mix until it's all combined.
Now, it's time to add the milk or cream, one tablespoon at a time. Mix on low speed until it starts to come together, then increase the speed and whip it until it's smooth and creamy. And don't forget the vanilla extract! It's like the secret ingredient that makes everything taste better. And lastly, don't be afraid to taste it as you go along! If it's not chocolatey enough, add more cocoa powder. If it's too thick, add more milk or cream. And if it's not sweet enough, add more powdered sugar. Taste and adjust until it's perfect. Remember, practice makes perfect, so don't worry if your first batch isn't flawless. Just keep at it, and you'll be a buttercream master in no time!
“Life is what you bake it.”
Achieving the Perfect Consistency: The Frosting Sweet Spot
The consistency of your frosting is key. You want it to be thick enough to hold its shape, but also smooth enough to spread easily. The goal is a frosting that's like soft, whipped cream - not too runny, not too stiff. If your frosting is too thick, add a little bit more milk or cream, one teaspoon at a time, until you reach the desired consistency. If it's too thin, add a little more powdered sugar, one tablespoon at a time. Also, if you're planning to pipe the frosting, you'll want it to be a bit thicker than if you're just spreading it on the cake. And if you're making the frosting ahead of time, remember to cover it tightly and store it in the fridge. When you're ready to use it, let it come to room temperature and whip it again before using it. This will make it light and fluffy again.
And remember that the consistency of frosting can be affected by the temperature of the room. If it's too hot, your frosting will melt. If it's too cold, your frosting will be stiff. You can always adjust the consistency as you go along. The key is to be patient and keep testing the frosting until it's just right. It's all about finding that sweet spot where the frosting is perfectly spreadable, pipe-able, and tastes absolutely amazing. So, don't be afraid to experiment and have fun with it! You're the boss of your buttercream. Now that you've got your frosting ready, let's move on to the fun part - assembling and frosting our beautiful layer chocolate cake!
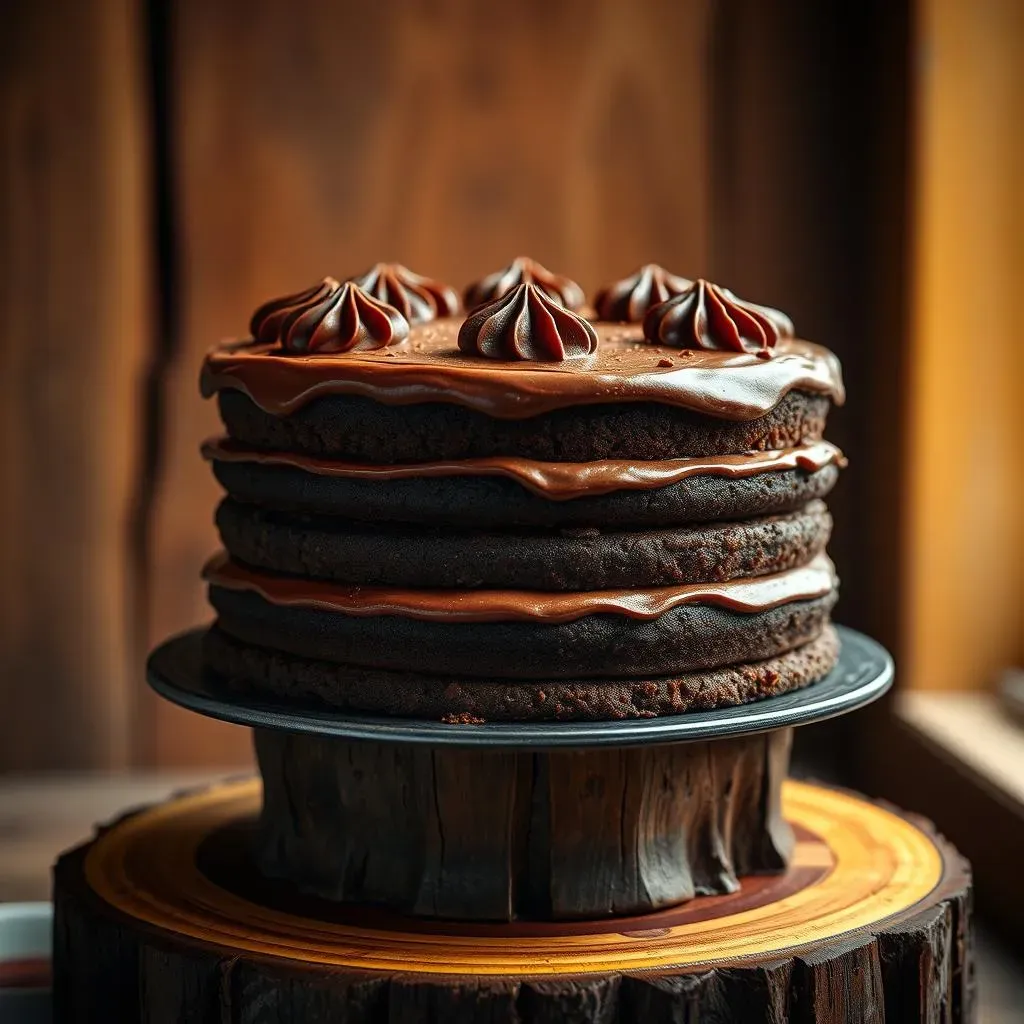
Layering and Assembling Your Masterpiece: Tips and Tricks for Success

Layering and Assembling Your Masterpiece: Tips and Tricks for Success
The Level Playing Field: Preparing Your Cake Layers
Alright, you've baked your cake layers, and they're looking gorgeous! But before you start slathering on that delicious frosting, it's important to make sure your cake layers are level. I know, I know, it sounds like a pain, but it's crucial for a stable and beautiful cake. If your cake layers have a dome on top, use a long serrated knife to carefully trim the tops so they're nice and flat. This will prevent your cake from wobbling and sliding around. You want a nice, flat surface for the frosting to adhere to. I usually do this while the cake is still slightly warm because it's easier to cut. But be careful, don't cut it if it is too hot, it can crumble. And remember, don't throw away those cake scraps! You can use them to make cake pops or trifles, or just eat them while you work.
Once your layers are level, you can decide whether you want to freeze them before frosting. Freezing them for about an hour will make them firmer and less likely to crumble when you're frosting. It also makes them easier to handle. If you're in a hurry, you can skip this step, but I highly recommend it if you're new to cake decorating. And if you're not using them right away, you can wrap them tightly in plastic wrap and freeze them for up to three months. Just make sure they're fully thawed before you start frosting. It's all about setting yourself up for success!
- Level cake layers using serrated knife
- Freeze layers for 1 hour for easier handling
- Wrap layers tightly for storage up to 3 months
The Frosting Fortress: Building a Stable Cake
Now for the fun part: frosting! The key to a stable layered cake is to start with a crumb coat. This is a thin layer of frosting that seals in all the crumbs, preventing them from getting mixed into your final frosting. Place your first cake layer on a cake stand or plate, then spread a thin layer of frosting over the top. Don't worry if it's not perfectly smooth, it's just the crumb coat. Then, add your second layer, and repeat with the frosting. If you're making a three-layer cake, add your third layer. If you have a wonky layer, you can try to even it out with the frosting. The cake is like a puzzle, you need to make sure all the pieces are in the right place.
Once you've got all the layers stacked and crumb-coated, it's time to chill the cake in the refrigerator for about 30 minutes. This will allow the crumb coat to set and make it easier to apply the final layer of frosting. After the cake has chilled, you can apply the final layer of frosting. Use an offset spatula to spread the frosting evenly over the top and sides of the cake. If you're going for a smooth finish, dip your spatula in warm water and wipe it dry before smoothing the frosting. This will help to create a smooth, even surface. And remember, it's okay if it's not perfect! You can always add decorations to cover up any imperfections.
“Baking is therapy.”
The Finishing Touches: Decorating Your Cake
Now that you've got your cake all frosted, it's time to get creative! You can keep it simple with a smooth finish or go all out with decorations. If you want a simple, elegant look, you can use a bench scraper to smooth the sides of the cake. Or, you can use a fork or spoon to create some texture. If you're feeling fancy, you can use a piping bag to add swirls, rosettes, or other designs. Don't be afraid to experiment and have fun with it! You can use sprinkles, chocolate shavings, fresh fruit, or anything else you like to decorate your cake. The most important thing is to make it your own!
And remember, practice makes perfect! The more you bake and decorate cakes, the better you'll get. And don't be afraid to make mistakes. It's all part of the learning process. The most important thing is to have fun and enjoy the process. Baking should be a joyful experience, not a stressful one. So, relax, put on some music, and let your creativity flow! Once you're done decorating, let the cake chill for at least 30 minutes before serving. This will allow the frosting to set and make it easier to cut. And that's it! You've created a beautiful, delicious layer chocolate cake with frosting. Now go show it off, you deserve it!
Decoration Type | Tools |
|---|---|
Smooth Finish | Bench scraper, warm water |
Textured Finish | Fork, spoon |
Piped Designs | Piping bag, tips |
Sprinkles/Toppings | Your imagination! |