Table of Contents
Forget fancy pastry shops or spending hours in the kitchen. We're talking about a dessert that looks impressive, tastes like pure indulgence, but won't make you want to throw your whisk across the room. If the thought of a warm, gooey center spilling out of a rich chocolate cake makes your heart skip a beat, but your baking skills feel, shall we say, *aspirational*, you're in the right place. We've all seen those perfect molten lava cakes online and thought, "Yeah, right, like I could ever make that." Well, prepare to change your mind. This isn't some finicky, high-maintenance dessert. This is a genuinely achievable chocolate molten lava cake recipe easy enough for almost anyone to pull off, even on a weeknight. We're going to walk you through exactly what you need, how to mix it without a fuss, and the simple trick to getting that perfect molten core every single time. No stress, just seriously good chocolate.
Gathering What You Need for Your Easy Chocolate Molten Lava Cake Recipe

Gathering What You Need for Your Easy Chocolate Molten Lava Cake Recipe
The Non-Negotiable Chocolate Situation
Alright, let's talk chocolate. This isn't the time for those dusty chocolate chips you found in the back of the pantry from who-knows-when. For a truly killer chocolate molten lava cake recipe easy or not, the chocolate is the star. You need good quality stuff. Think bittersweet or semi-sweet chocolate, the kind that comes in bars you actually enjoy snacking on. Chop it up yourself from a bar – it melts better and tastes richer than pre-chopped stuff or chips. I'm talking Ghirardelli, Lindt, Callebaut, something with actual flavor depth. Using waxy, cheap chocolate is like building a Ferrari with bicycle parts. Don't sabotage your molten dreams before you even start.
Beyond the Bean: Butter, Eggs, and Ramekins
chocolate sorted. Now for the supporting cast. You'll need butter, obviously, because butter makes everything better, especially molten centers. Eggs are crucial; they provide structure and help get that airy texture before the magic happens in the oven. Sugar, a little flour (just a touch, don't go crazy, we want lava, not cake), and a pinch of salt to make the chocolate pop. And you absolutely need ramekins. Six-ounce or eight-ounce ramekins work best. You can find them anywhere – grocery stores, online, even thrift shops if you're lucky. Make sure you have enough for your batch. Greasing them properly is key, but we'll get to that little detail later.
- Good quality bittersweet or semi-sweet chocolate bar
- Unsalted butter
- Large eggs
- Granulated sugar
- All-purpose flour
- Pinch of salt
- 6 or 8-ounce ramekins (usually 4-6 needed for a standard batch)
Melting Chocolate and Mixing the Batter: Key Steps for Easy Lava Cakes

Melting Chocolate and Mixing the Batter: Key Steps for Easy Lava Cakes
The Chocolate Melting Situation: Don't Burn It!
you've got your good chocolate chopped up. Now, we need to melt it with the butter. The goal here is smooth and glossy, not burnt and grainy. A double boiler is your best friend here, or a heatproof bowl set over a pot of simmering water. Don't let the water touch the bottom of the bowl. Gentle heat is the name of the game. Stir it occasionally until it's about 90% melted, then take it off the heat and stir until the residual heat finishes the job. This prevents scorching. Microwaving is faster, sure, but it's also a fast track to burnt chocolate sadness if you're not careful. If you go the microwave route, use 30-second bursts, stirring well after each one, until it's mostly melted, then let it sit and stir to finish.
Whipping Eggs and Combining Everything Gently
While your chocolate cools slightly (you don't want to scramble the eggs!), whip your eggs and sugar together. This is where you build some of that structure that holds the cake together just long enough for the center to stay molten. Beat them until they're thick and pale yellow, like a really good milkshake. Gently fold the slightly cooled chocolate-butter mixture into the egg mixture. Then, and this is crucial for a successful chocolate molten lava cake recipe easy or complex: *gently* fold in the tiny bit of flour and salt. Don't beat it like you're angry at it. Overmixing the flour develops too much gluten, giving you a cakey center instead of glorious lava. We're aiming for just combined, no visible streaks of flour.
Common Mixing Mistakes to Avoid:
- Adding hot chocolate to the eggs (hello, scrambled eggs!)
- Over-mixing the flour (say goodbye to your lava)
- Not scraping down the sides of the bowl
- Leaving lumps of unmixed flour
Baking and Serving Your Perfect Chocolate Molten Lava Cake Recipe

Baking and Serving Your Perfect Chocolate Molten Lava Cake Recipe
Prepping the Ramekins for Release
batter made. Now, don't mess it up at the finish line by having your perfect chocolate molten lava cake recipe easy turn into a stuck-to-the-dish disaster. Greasing your ramekins is non-negotiable. Use softened butter, not melted, and get into every nook and cranny. Use a pastry brush or even just your fingers. Once they're coated in butter, add a spoonful or two of cocoa powder or granulated sugar. Swirl it around, tap out the excess. This creates a non-stick layer that is absolutely essential for getting those beautiful cakes out in one piece. Divide the batter evenly among your prepared ramekins. Don't fill them right to the brim; leave a little room for them to rise slightly.
The Critical Bake Time: Don't Overdo It!
This is arguably the most nerve-wracking step in any chocolate molten lava cake recipe easy or hard: the baking. Get your oven preheated properly, usually around 375-400°F (check your specific recipe, but that's the ballpark). Place the ramekins on a baking sheet – this makes them easier to get in and out of the oven and catches any potential drips. Bake them for typically 12-15 minutes. The edges should look set and slightly pulled away from the sides of the ramekin, but the center needs to look soft and jiggly when you gently shake one. If the whole top looks firm, you've probably overbaked it, and your lava might be more like fudge. Keep a close eye on them, especially the first time you make this chocolate molten lava cake recipe easy style. Ovens vary wildly.
Sign of Doneness | What It Means |
|---|---|
Edges are set and slightly firm | Cake structure is forming |
Center is soft and jiggly | Lava core is still liquid |
Whole top is firm | Likely overbaked (less lava, more cake) |
Cooling, Flipping, and the Grand Reveal
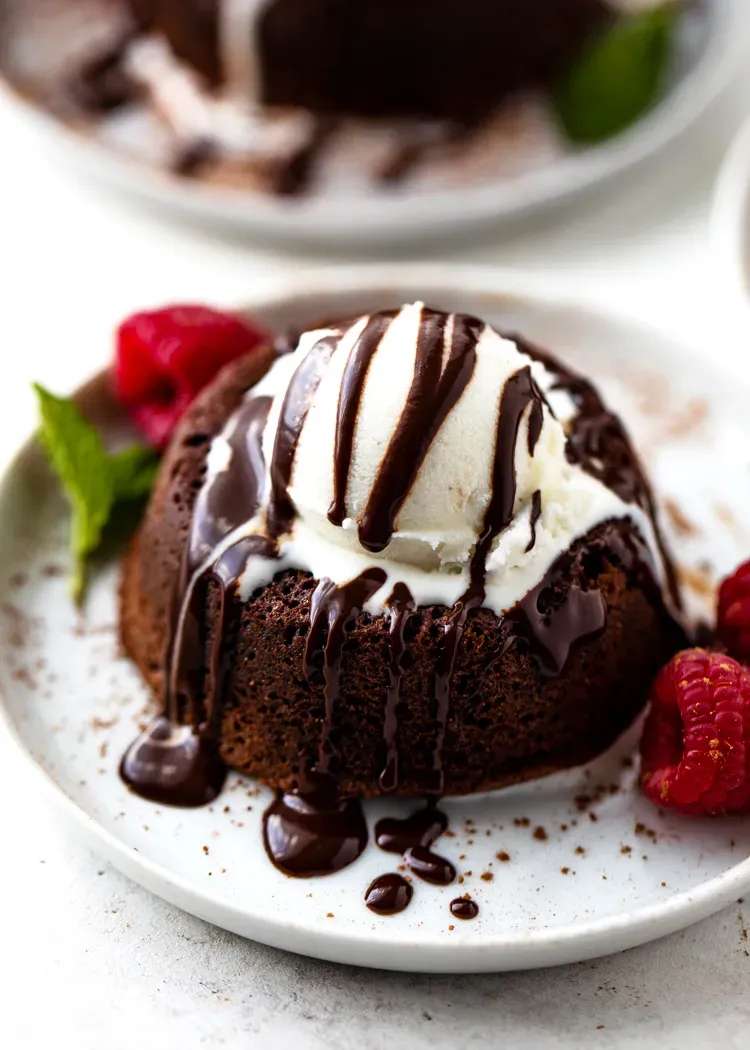
Once they come out of the oven, resist the urge to immediately flip them. Let them sit for just 2-3 minutes. This short rest period allows the edges to firm up a little more, making them much easier to release. Run a knife gently around the edge of each ramekin to loosen it. Place a serving plate upside down over the ramekin, then, holding both firmly, flip them over. Lift the ramekin slowly. If you prepped them correctly, the cake should slide right out, leaving you with a perfect, individual molten chocolate mound. If one sticks, well, sometimes it happens. Scoop it out and serve it in a bowl – it'll taste the same, just less photogenic. Serve them warm, maybe with a scoop of vanilla ice cream or a dusting of powdered sugar. The lava waits for no one.
Tips, Tricks, and Making This Easy Chocolate Lava Cake Recipe Ahead

Tips, Tricks, and Making This Easy Chocolate Lava Cake Recipe Ahead
Tips, Tricks, and Making This Easy Chocolate Lava Cake Recipe Ahead
so you’ve nailed the basic chocolate molten lava cake recipe easy style. What next? Let's talk about making life even simpler or jazzing things up. One of the best tricks for these guys is that they are incredibly make-ahead friendly. You can whip up the batter, pour it into your prepped ramekins, cover them tightly with plastic wrap, and stash them in the fridge for up to 24 hours. When you're ready for dessert, just pull them out, pop them in the preheated oven (you might need an extra minute or two since they're cold), and bake as usual. This is a game-changer for dinner parties or when you just want a quick, impressive treat without the last-minute mess. Another tip? Don't be afraid to experiment with flavor. A pinch of espresso powder in the batter deepens the chocolate flavor beautifully, or a tiny splash of orange extract or a liqueur like Grand Marnier can add a sophisticated twist.
Make-Ahead & Flavor Boosts:
- Prepare batter and pour into greased/cocoa'd ramekins.
- Cover ramekins tightly with plastic wrap.
- Refrigerate for up to 24 hours.
- Bake directly from the fridge (add 1-3 minutes to bake time).
- Add 1/2 tsp espresso powder for richer chocolate flavor.
- Try a few drops of orange extract or a tablespoon of liqueur (like raspberry or orange) for variation.
Your Easy Chocolate Molten Lava Cake Awaits
So there you have it. No need for a culinary degree or a small army of kitchen gadgets. Just a handful of ingredients, a little melting, a little mixing, and a short stint in the oven stand between you and a dessert that consistently impresses. This chocolate molten lava cake recipe easy truly lives up to its name. Stop scrolling through drool-worthy photos and actually make one. You might be surprised how simple it is to achieve that perfect, flowing chocolate center right in your own kitchen. Give it a shot; the worst that happens is you end up with warm, rich chocolate cake, which frankly, isn't the worst outcome in the world.