Table of Contents
Alright, let's cut to the chase. You want a dessert that looks fancy, tastes ridiculously good, and maybe, just maybe, doesn't require a culinary degree to pull off. Enter the molten chocolate lava cake. That moment when you break through the tender cake exterior and a river of warm, gooey chocolate spills out? Yeah, that's the good stuff. If you're looking for a reliable way to achieve this chocolatey magic, the chocolate lava cake recipe paula deen is a popular starting point for many home bakers.
Making Paula Deen's Chocolate Lava Cake Recipe

Making Paula Deen's Chocolate Lava Cake Recipe
so you're diving into the world of molten chocolate, specifically the Making Paula Deen's Chocolate Lava Cake Recipe. Good choice. It's one of those desserts that delivers maximum impact with surprisingly minimal fuss, provided you nail a few key steps. Think of it less like building a rocket ship and more like tuning a guitar – precision matters, but it’s totally doable. Paula's take is usually pretty straightforward, focusing on classic ingredients and simple mixing, which is perfect when you just want that decadent chocolate flow without overthinking it. We're aiming for that moment when the fork goes in, and warm, liquid chocolate pools onto the plate. It's less about complex pastry techniques and more about timing and trusting the process.
Gathering Ingredients for Your Molten Masterpiece

Gathering Ingredients for Your Molten Masterpiece
The Non-Negotiables: Chocolate and Butter
Alright, let's talk turkey, or rather, chocolate. When you're tackling a chocolate lava cake recipe paula deen style, the quality of your chocolate actually matters. Don't grab those dusty semi-sweet chips you found at the back of the pantry from three Thanksgivings ago. You need good quality semi-sweet and bittersweet chocolate. Think baking bars, not snacking chocolate. Why both? The bittersweet gives you that deep, intense chocolate flavor without being cloyingly sweet, while the semi-sweet provides a bit more balance and melts beautifully. And butter? Use real butter. Unsalted is best so you control the salt level, but honestly, for this, just make sure it's butter, not some weird spread. You're melting these two together, creating the rich base, so don't skimp here. It's the foundation of your molten core.
Eggs, Sugar, Flour, and the Supporting Cast
Beyond the chocolate and butter, you've got your standard baking lineup. Eggs provide structure and richness – usually a mix of whole eggs and maybe an extra yolk for that custardy center. Sugar, of course, adds sweetness, often confectioners' sugar which dissolves easily, leading to a smoother batter. You'll need just a touch of flour; this isn't a traditional cake where gluten development is key. The flour here primarily helps stabilize the edges while keeping the center liquid. Vanilla extract is a must for rounding out the flavors. Paula's recipe sometimes suggests a splash of orange liqueur, which, frankly, is a brilliant move. Chocolate and orange are a classic pairing for a reason. It adds a little something extra, a subtle brightness that cuts through the richness. Don't have orange liqueur? A splash of good quality vanilla or even a touch of espresso powder can work wonders.
- Use high-quality baking chocolate (semi-sweet and bittersweet).
- Stick to real butter, preferably unsalted.
- Ensure eggs are at room temperature for better mixing.
- Don't overmeasure the flour; precision is key for that runny center.
- Consider the optional orange liqueur for an extra flavor dimension.
StepbyStep: Baking Paula Deen's Chocolate Lava Cakes

StepbyStep: Baking Paula Deen's Chocolate Lava Cakes
Melting and Mixing Your Way to Molten
you've got your ingredients lined up. Now for the actual doing part of the StepbyStep: Baking Paula Deen's Chocolate Lava Cakes. First things first, you need to melt that good chocolate and butter together. Do this gently. A double boiler is classic, but a microwave works fine if you go low and slow, stirring every 30 seconds. You don't want to scorch that precious chocolate. Once it's smooth and glossy, set it aside to cool slightly. You don't want to scramble your eggs later by dumping them into hot chocolate lava.
While the chocolate cools, whisk your eggs and sugar together. You're not aiming for meringue peaks here, just getting them combined and the sugar starting to dissolve. Then, whisk in that slightly cooled chocolate mixture. Don't overmix; you're just bringing everything together. Finally, fold in the flour and vanilla (and that optional orange liqueur if you're feeling sassy). Again, gentle folding is key. You want a smooth batter, but don't beat the life out of it. Overmixing flour develops gluten, which is great for bread, terrible for a delicate lava cake center.
Filling Ramekins and Hitting the Oven
Now you've got your beautiful, rich batter. Time to get it into the vessels of destiny: the ramekins. Butter and flour these things *liberally*. Seriously, get into every nook and cranny. This is the crucial step that prevents your molten masterpiece from becoming a stuck-in-the-dish tragedy. You want these cakes to slide right out. Divide the batter evenly among your prepared ramekins. Don't fill them right to the brim; leave a little room for them to rise slightly.
Oven time is where the magic, and the potential heartbreak, happens. Paula usually calls for a hot oven, around 425°F (220°C). The high heat helps the outside set quickly while the inside stays molten. Bake them for around 14 minutes. This is the critical window. You want the edges to look set and firm, maybe pulling away slightly from the sides, but the center should still look soft and jiggly when you gently shake a ramekin. If they look fully set all the way across the top, you've probably gone too far, and you'll have a delicious, dense chocolate cake instead of a lava cake. Still good, but not the goal.
Consider this: The difference between a perfect molten center and a solid cake is often measured in seconds. Standing by the oven, peering through the glass, is not a sign of impatience; it's a sign of a baker who understands the stakes.
- Melt chocolate and butter gently; avoid high heat.
- Let melted chocolate cool slightly before adding eggs.
- Whisk eggs and sugar just until combined.
- Fold in flour and other ingredients; do not overmix.
- Butter and flour ramekins generously.
- Bake at a high temperature (around 425°F).
- Watch baking time closely (approx. 14 minutes); look for set edges and a jiggly center.
Tips and Serving Suggestions for Perfect Chocolate Lava Cakes

Tips and Serving Suggestions for Perfect Chocolate Lava Cakes
Getting Them Out and Looking Sharp
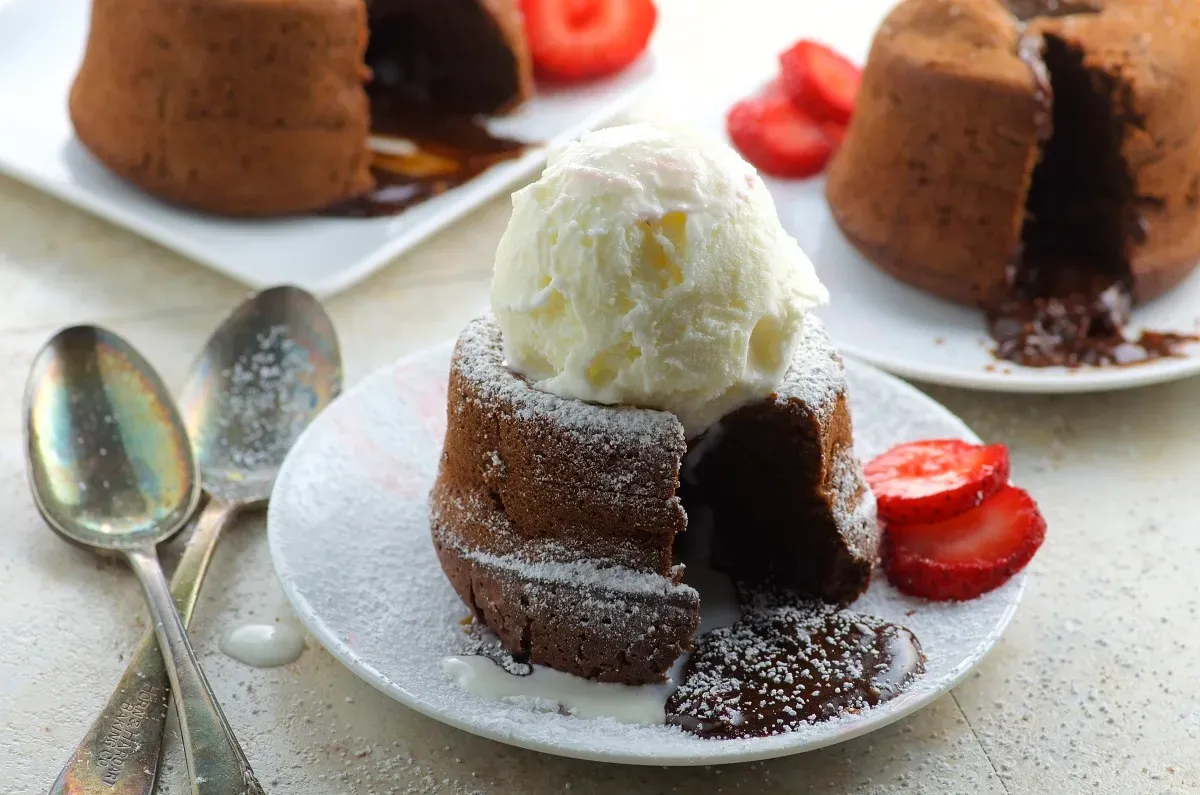
you've baked these beauties, you've peeked through the oven door, and they look spot on – set edges, wobbly center. Now comes the moment of truth: getting them out of the ramekins. Remember how we buttered and floured them like our lives depended on it? This is why. Let them cool for just a minute or two out of the oven. Seriously, just a minute. Too long, and the center might set up more than you want; too short, and they might collapse. Run a thin knife around the edge – gently! – then place your dessert plate upside down over the ramekin. Flip the whole contraption over with confidence. Give it a little shake if needed, and with any luck, it should slide out, a perfect little chocolate mound ready for its close-up. If one sticks, well, sometimes that happens. Eat it straight from the ramekin with a spoon. Quality control, right?
Elevating Your Molten Masterpiece
Serving these isn't just about putting a cake on a plate. It's about creating an experience. The classic pairing, of course, is a scoop of really good vanilla bean ice cream. The cold, creamy contrast with the warm, molten chocolate is frankly divine. But don't stop there. A dusting of confectioners' sugar is simple and elegant. A few fresh raspberries or strawberries add a pop of color and tartness that cuts through the richness. A drizzle of raspberry sauce or a dollop of freshly whipped cream? Absolutely. If you used that orange liqueur in the batter, a thin slice of candied orange peel on top is a sophisticated touch. Think about what complements rich chocolate without overwhelming it. Sometimes, less is more; other times, a full-on dessert party on the plate is exactly right.
- Vanilla bean ice cream
- Fresh berries (raspberries, strawberries)
- Dusting of confectioners' sugar
- Freshly whipped cream
- Raspberry sauce
- Candied orange peel
Common Questions About Paula Deen's Molten Cakes

Common Questions About Paula Deen's Molten Cakes
Why Didn't My Lava Flow? Troubleshooting the Molten Center
so you followed the steps, you pulled them from the oven, you flipped them over, and... nothing. Just a solid chocolate cake. Don't despair, it happens. The most common culprit when your chocolate lava cake recipe from Paula Deen (or anyone else, frankly) doesn't deliver the molten core is usually the baking time or temperature. Remember that sweet spot of around 14 minutes at 425°F? That's a guideline, not gospel. Ovens vary wildly. Your oven might run hot, or maybe you left them in for an extra minute "just to be sure." That extra minute can be the difference between glorious molten chocolate and a perfectly good, but not *lava*, cake. Also, double-check your oven thermometer if you have one. That dial on the front can lie.
Could it be something else? Possibly. Overmixing the batter can develop too much structure. Using the wrong type of chocolate (like chips designed to hold their shape) might also contribute, though good quality baking chocolate is less likely to cause this specific issue. But seriously, nine times out of ten, it's the oven time.
Here's a quick checklist if your lava wasn't flowing:
- Did you bake for the exact time specified, or did you go longer?
- Is your oven temperature accurate?
- Did the centers still look visibly soft or jiggly when they came out?
- Did you overmix the batter after adding the flour?
Can I Make the Batter Ahead of Time?
Ah, the classic party prep question. Can you get a head start on this chocolate lava cake recipe a la Paula Deen? Generally, yes, you can mix the batter a few hours ahead of time. Whip it up, cover it tightly, and stash it in the fridge. When you're ready to bake, portion the cold batter into your prepared ramekins. You might need to add a minute or two to the baking time since the batter is starting cold, but keep a close eye on them. You're still looking for those set edges and a slightly wobbly center.
Making them entirely ahead and reheating? That's trickier. While technically possible, reheating can sometimes cause the center to set up further, defeating the purpose. These really are best served fresh from the oven after that crucial baking time. If you absolutely must make them ahead, baking them and gently reheating *might* work, but it's a gamble on getting that perfect flow compared to baking the batter just before serving.
Your Chocolate Lava Cake Victory Lap
So there you have it. You've navigated the simple steps, dodged potential pitfalls, and are now staring down a warm, chocolatey volcano of your own making. The chocolate lava cake recipe paula deen isn't some mythical beast; it's a dessert you can actually whip up without needing a professional kitchen or a team of assistants. Whether you nail it on the first try or learn a thing or two along the way, the payoff – that first spoonful into the molten center – is usually worth the effort. Now go enjoy the spoils of your baking labor.