Table of Contents
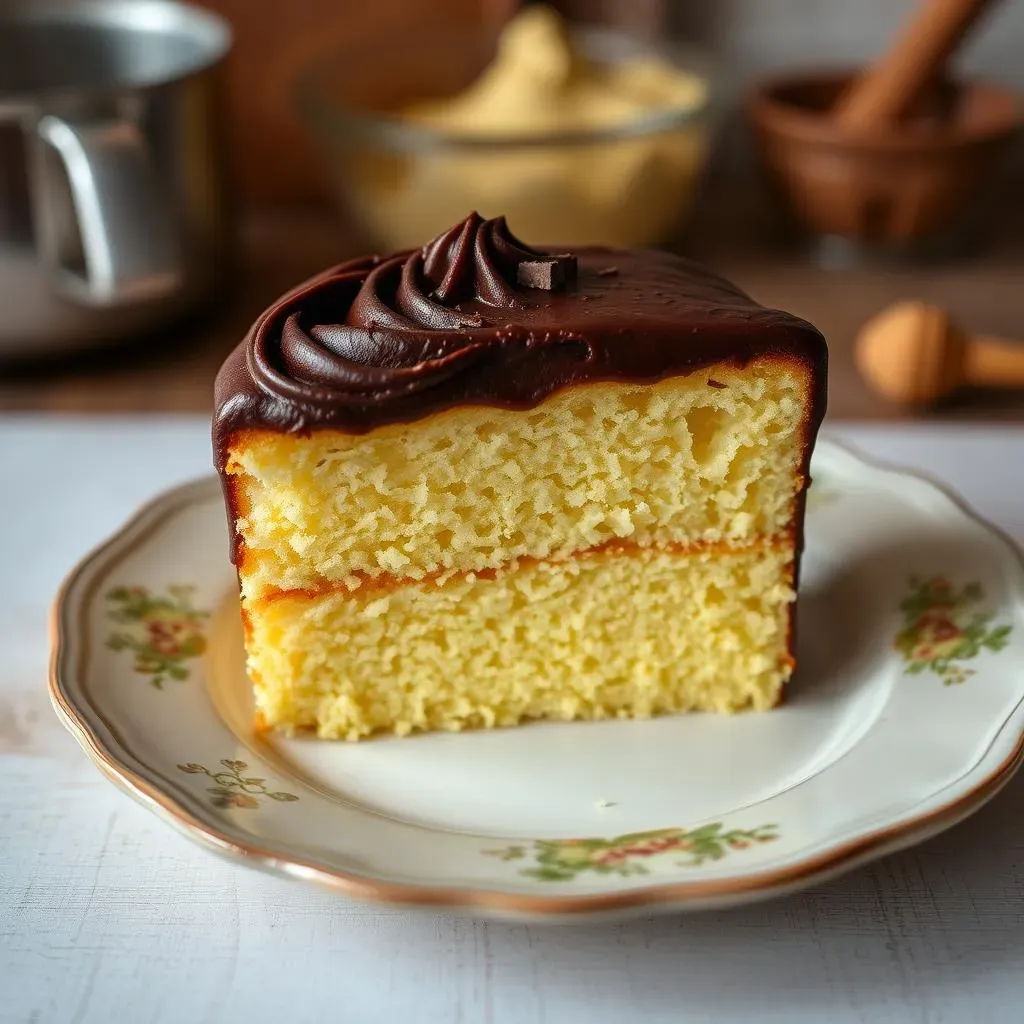
Is there a more classic pairing than yellow cake and chocolate frosting? It's a combo that screams birthday parties, Sunday suppers, and pure, unadulterated comfort. But let's be real, not all yellow cakes are created equal, and the same goes for chocolate frosting. We're not settling for dry cake or grainy frosting today. We're on a quest for the *best chocolate frosting recipe for yellow cake* – the kind that makes you close your eyes and savor every single bite.
Why Yellow Cake and Chocolate Frosting is a Match Made in Heaven

Why Yellow Cake and Chocolate Frosting is a Match Made in Heaven
The Perfect Flavor Contrast
Think about it: yellow cake, with its subtle buttery sweetness and delicate vanilla notes, is like a blank canvas. It's inviting, comforting, but maybe a little…plain on its own. Then BAM! Chocolate frosting swoops in, delivering a rich, intense, and slightly bitter counterpoint. It’s that push and pull, that yin and yang of flavors, that makes the combination so addictive. It’s not just sweet; it’s complex and satisfying.
It's like a perfectly balanced cup of coffee – a little bitterness, a little sweetness, all working together in harmony. The yellow cake mellows out the intensity of the chocolate, while the chocolate elevates the simple flavor of the cake. It's a team effort, a culinary collaboration that has stood the test of time for good reason.
Texture and Nostalgia
Beyond the flavor, the textures are just as important. You've got the soft, tender crumb of the yellow cake, yielding effortlessly with each bite. Then comes the smooth, creamy, melt-in-your-mouth chocolate frosting. It's a textural symphony that’s incredibly pleasing. Imagine a rough, dry cake with some chunky frosting... no thanks!
And let's not forget the nostalgia factor. For many of us, yellow cake with chocolate frosting is a taste of childhood. It's birthday parties, school bake sales, and Grandma's kitchen. It's a dessert that evokes warm memories and a sense of comfort. That emotional connection is a huge part of why we crave it, and why it continues to be a beloved classic.
Flavor Profile | Texture | Emotion |
|---|---|---|
Sweet & Buttery vs. Rich & Bitter | Soft & Tender vs. Smooth & Creamy | Comfort & Nostalgia |
Crafting the Perfect Yellow Cake: Tips and Tricks
Crafting the Perfect Yellow Cake: Tips and Tricks
Key Ingredients for Yellow Cake Success
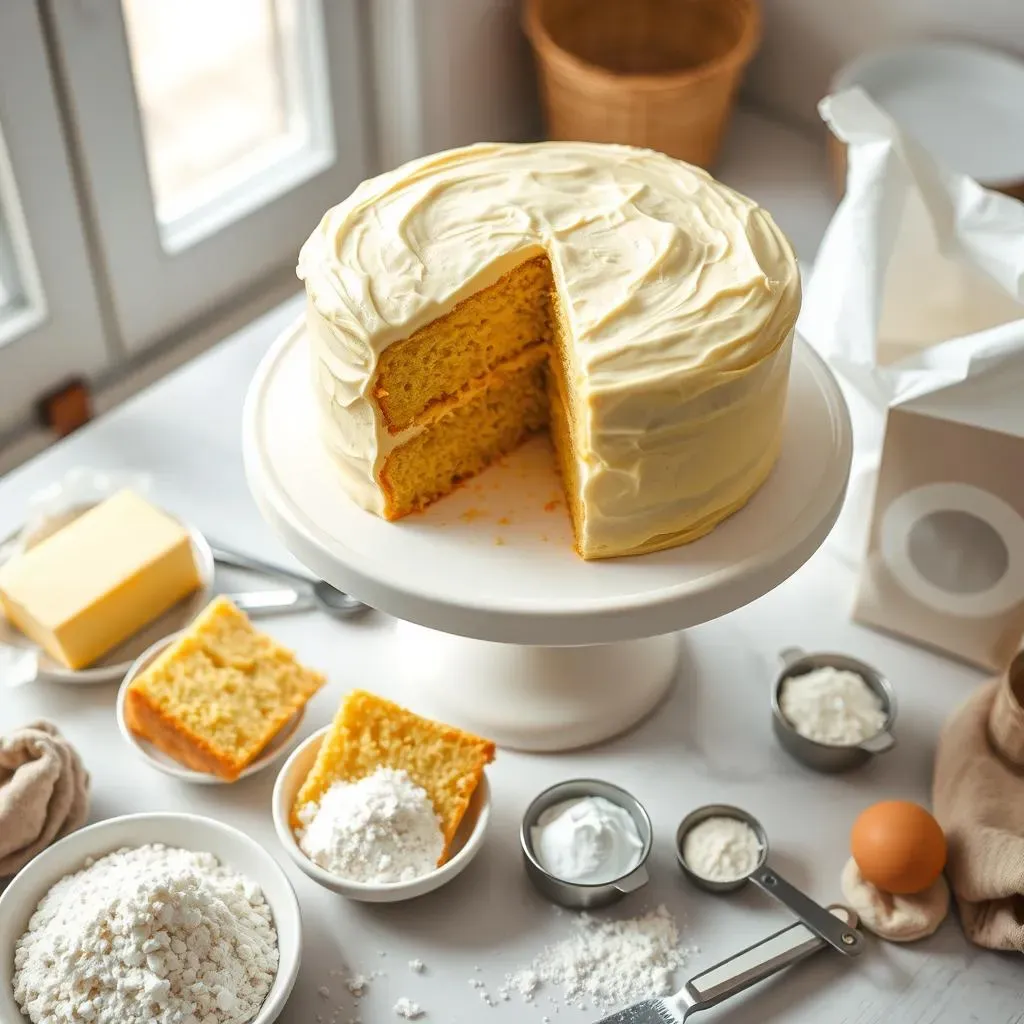
Alright, let's get down to the nitty-gritty of baking the perfect yellow cake. It all starts with the ingredients. Don't skimp on quality here; it makes a difference! First up: butter. Use real, unsalted butter for the best flavor and texture. Make sure it's softened, but not melted, for easy creaming. Next, sugar. Granulated sugar is the classic choice, providing sweetness and structure. Eggs are crucial for richness and binding, so use large, fresh ones. And don't forget the vanilla extract – it enhances all the other flavors and adds that signature yellow cake aroma.
Flour is another key player. All-purpose flour works fine, but for a truly tender cake, consider using cake flour or a combination of all-purpose and cornstarch. The lower protein content of cake flour results in a softer crumb. Finally, don't forget the leavening agents: baking powder and baking soda. These give the cake its rise and light texture. Make sure they're fresh, or your cake might end up flat and dense.
Mixing Matters: Achieving the Right Batter
The way you mix your batter is just as important as the ingredients themselves. Start by creaming together the softened butter and sugar until light and fluffy. This incorporates air into the batter, which is essential for a tender cake. Next, beat in the eggs one at a time, followed by the vanilla extract. Be sure to scrape down the sides of the bowl occasionally to ensure everything is evenly mixed.
In a separate bowl, whisk together the dry ingredients: flour, baking powder, baking soda, and salt. Gradually add the dry ingredients to the wet ingredients, alternating with milk or buttermilk. Start and end with the dry ingredients, and mix until just combined. Be careful not to overmix, as this can develop the gluten in the flour and result in a tough cake. A few streaks of flour are okay – they'll disappear during baking.
Mixing Stage | Purpose | Key Technique |
|---|---|---|
Creaming Butter & Sugar | Incorporate Air | Beat until light and fluffy |
Adding Eggs | Emulsify & Add Richness | Beat in one at a time |
Alternating Dry & Wet Ingredients | Combine without Overmixing | Start & end with dry ingredients |
Baking for Perfection: Temperature and Time
Now for the baking part! Preheat your oven to 350°F (175°C). Grease and flour your cake pans to prevent sticking. For extra insurance, you can line the bottoms of the pans with parchment paper circles. Divide the batter evenly among the pans and spread it out smoothly.
Bake for 30-35 minutes, or until a toothpick inserted into the center comes out clean. Let the cakes cool in the pans for 10 minutes before inverting them onto a wire rack to cool completely. This prevents them from sticking and makes them easier to frost. And remember, every oven is different, so keep an eye on your cakes and adjust the baking time as needed. Happy baking!
- Preheat oven to 350°F (175°C).
- Grease and flour cake pans.
- Bake for 30-35 minutes, or until a toothpick comes out clean.
The Star: Mastering the Best Chocolate Frosting Recipe
The Star: Mastering the Best Chocolate Frosting Recipe
Choosing Your Chocolate: Cocoa Powder vs. Melted Chocolate
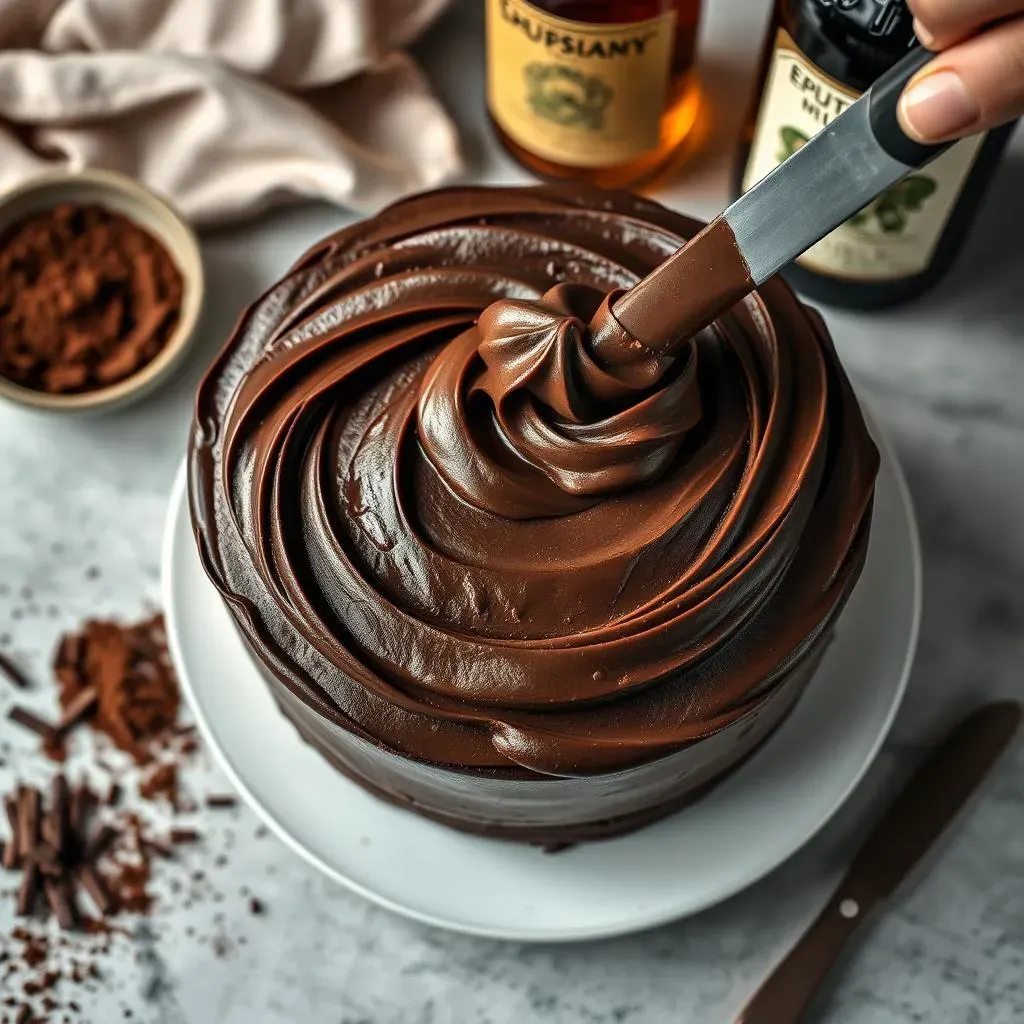
Alright, let's talk chocolate! When it comes to frosting, you've got options. The two main contenders are cocoa powder and melted chocolate. Cocoa powder gives you a deep, intense chocolate flavor and a slightly drier frosting. Melted chocolate, on the other hand, results in a richer, smoother, and more decadent frosting. Which one is better? It depends on your preference! For a classic, old-fashioned chocolate frosting, cocoa powder is the way to go. For a truly luxurious experience, opt for melted chocolate. Or, for the best of both worlds, you can even use a combination of the two!
If you're using cocoa powder, go for Dutch-processed cocoa, which has a smoother, less acidic flavor than natural cocoa. If you're using melted chocolate, choose a high-quality dark or semi-sweet chocolate with a cocoa content of at least 60%. Avoid using chocolate chips, as they often contain stabilizers that can prevent them from melting smoothly. No matter which option you choose, make sure your chocolate is fresh and flavorful for the best possible results.
Buttercream Basics: Achieving Fluffy Perfection
Now that we've covered the chocolate, let's move on to the buttercream. Buttercream is the foundation of most chocolate frostings, and it's essential to get it right. The key to fluffy, delicious buttercream is using softened, but not melted, butter. The butter should be soft enough to easily cream, but not so soft that it's greasy. If your butter is too cold, it will be difficult to cream, and your frosting will be dense and lumpy. If your butter is too warm, it will melt and your frosting will be greasy and flat.
Start by creaming the softened butter until light and fluffy. This incorporates air into the buttercream, which is essential for a light and airy texture. Next, gradually add powdered sugar, beating until smooth. Add a pinch of salt to balance the sweetness and a splash of vanilla extract to enhance the flavor. If your buttercream is too thick, add a little milk or cream to thin it out. If it's too thin, add a little more powdered sugar to thicken it up. And remember, taste as you go! Adjust the sweetness and flavor to your liking.
Ingredient | Purpose | Key Tip |
|---|---|---|
Softened Butter | Foundation of Buttercream | Soft but not melted |
Powdered Sugar | Sweetness & Structure | Add gradually |
Milk or Cream | Adjust Consistency | Add a little at a time |
The Secret Ingredient: Adding Depth and Complexity
Want to take your chocolate frosting to the next level? Try adding a secret ingredient to enhance the flavor and complexity. A pinch of espresso powder can intensify the chocolate flavor and add a subtle mocha note. A tablespoon of dark rum or bourbon can add warmth and depth. A dash of cinnamon or cayenne pepper can add a hint of spice. Or, for a truly unique flavor, try adding a tablespoon of peanut butter or Nutella.
The possibilities are endless! Just be careful not to add too much, as you don't want to overpower the chocolate flavor. Start with a small amount and taste as you go. And don't be afraid to experiment! Some of the best chocolate frostings are the result of happy accidents. With a little creativity, you can create a chocolate frosting that's truly unforgettable.
- Espresso powder for mocha flavor
- Dark rum or bourbon for warmth
- Cinnamon or cayenne pepper for spice
Assembling and Storing Your Yellow Cake with Chocolate Frosting

Assembling and Storing Your Yellow Cake with Chocolate Frosting
The Art of Assembling: Layering and Frosting
Alright, you've baked your perfect yellow cake layers and whipped up a batch of that killer chocolate frosting. Now comes the fun part: assembling! First, make sure your cake layers are completely cool. Warm cake + frosting = melty mess. Place one cake layer on a serving plate or cake stand. If you want to get fancy, you can place strips of parchment paper around the edges of the plate to keep it clean while frosting.
Next, dollop a generous amount of chocolate frosting on top of the first layer and spread it out evenly with an offset spatula or knife. Aim for a consistent thickness – about 1/4 to 1/2 inch is a good starting point. Place the second cake layer on top and repeat the frosting process. If you're using a third layer, do the same. Finally, frost the sides of the cake, smoothing out the frosting as much as possible. Don't worry about being perfect; a rustic, slightly imperfect frosting job can be just as charming!
Achieving the Perfect Finish: Smoothing and Decorating
Once your cake is fully frosted, it's time to add the finishing touches. For a smooth, professional look, try running your offset spatula under hot water and then wiping it dry before smoothing the frosting. The heat will help to melt the frosting slightly, making it easier to smooth out any imperfections. You can also use a cake comb or textured scraper to create interesting patterns on the sides of the cake.
Now for the fun part: decorating! Sprinkles are always a classic choice, but you can also use chocolate shavings, fresh berries, chopped nuts, or even edible flowers. Get creative and let your personality shine! If you're feeling ambitious, you can even pipe decorative borders or designs using a piping bag and various tips. The possibilities are endless!
Assembly Step | Technique | Tip |
|---|---|---|
Layering | Evenly distribute frosting | Use an offset spatula |
Smoothing | Warm your spatula | Create a smooth surface |
Decorating | Get creative! | Use sprinkles, berries, or chocolate shavings |
Storing Your Masterpiece: Keeping it Fresh
So, you've created this magnificent yellow cake with chocolate frosting, but how do you keep it fresh? If you're serving it within a day or two, you can store it at room temperature in an airtight container or under a cake dome. However, if you want to keep it fresh for longer, it's best to store it in the refrigerator. The cold temperature will help to prevent the frosting from melting and the cake from drying out.
Before refrigerating, make sure the cake is well-covered to prevent it from absorbing any odors from the fridge. You can also freeze the cake for longer storage. Wrap it tightly in plastic wrap and then place it in a freezer-safe bag or container. Frozen cake can last for up to 2-3 months. When you're ready to serve it, thaw it in the refrigerator overnight. A properly stored cake is a happy cake!
- Room temperature (1-2 days): Airtight container or cake dome
- Refrigerator (up to a week): Well-covered
- Freezer (2-3 months): Wrapped tightly in plastic wrap
Your Yellow Cake and Chocolate Frosting Masterpiece Awaits
So, there you have it – your complete guide to creating the ultimate yellow cake with the best chocolate frosting recipe. From nailing that perfect crumb to whipping up a frosting that's intensely chocolatey and smooth, you're now armed with the knowledge to bake a truly unforgettable dessert. Whether it's for a special occasion or just a craving that needs satisfying, this cake is sure to bring smiles and sweet memories. Now, go preheat that oven and get ready to bake some magic!