Table of Contents
Ever wanted to make those adorable, bite-sized chocolate cake pops you see everywhere? Forget the store-bought stuff. I'm going to show you how to whip up the best chocolate cake pop recipe completely from scratch. No cake mix shortcuts here! We're talking real, homemade goodness that tastes way better than anything you can buy. Think of it as a fun baking project that ends with delicious rewards. First, we'll bake a moist, rich chocolate cake. Then, we'll crumble it up and mix it with a luscious chocolate frosting. Roll those into balls, chill 'em, and give them a dunk in melted chocolate. Sprinkles are a must, of course! I'll share all my secrets for cake pop success, like how to avoid greasy cake pops and how to keep them from falling apart. Plus, I'll give you some fun flavor variations to try. Get ready to impress your friends and family with these irresistible treats! So, grab your apron, and let's get baking!
Baking the Perfect Chocolate Cake for Cake Pops
Baking the Perfect Chocolate Cake for Cake Pops
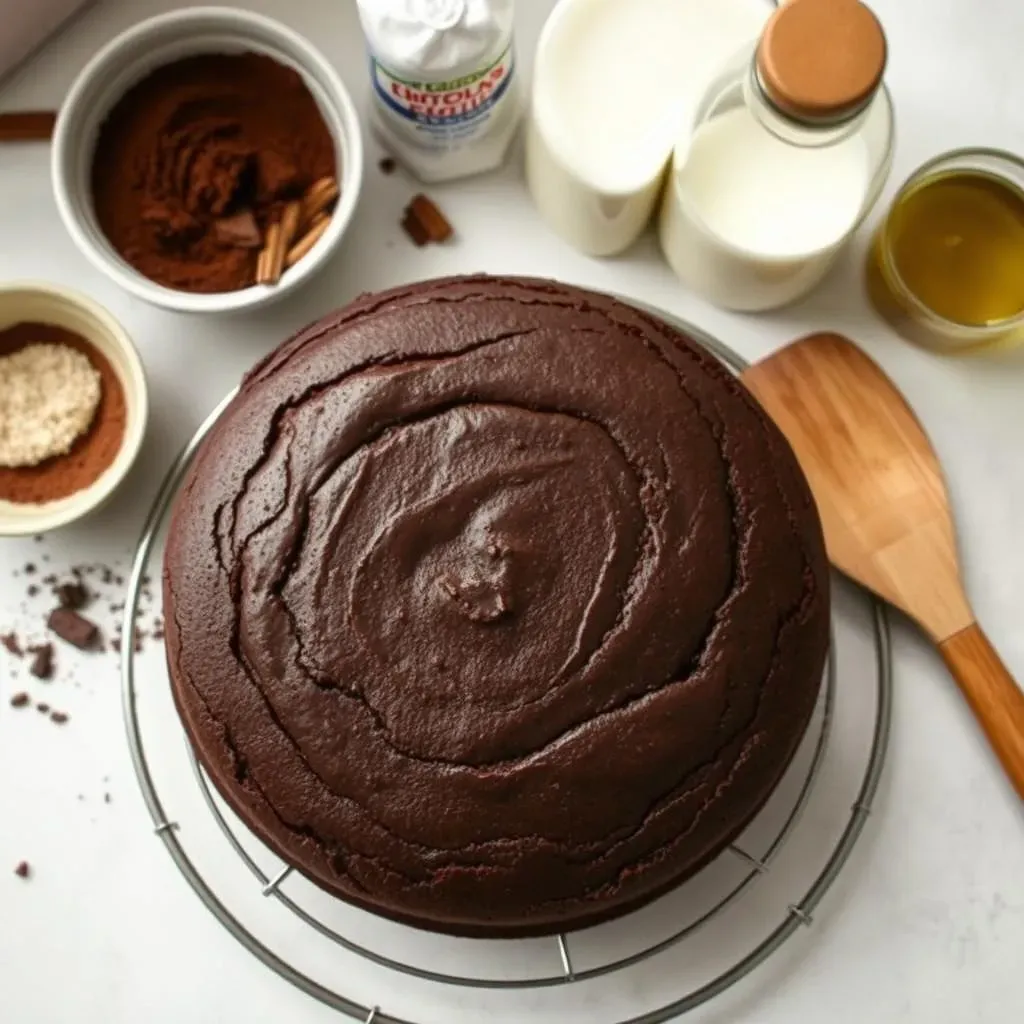
Alright, so you want to make amazing cake pops? It all starts with the cake, my friend. You can't have a stellar cake pop without a solid base, right? We're aiming for a chocolate cake that's moist, tender, and packed with flavor. Think about it: dry, crumbly cake equals sad, disappointing cake pops. Nobody wants that! I usually go for a one-layer cake because it's easier to manage and provides the perfect amount of cake for a batch of pops.
Now, you might be tempted to grab a box of cake mix, and hey, no judgment here. But trust me, making it from scratch is worth the extra effort. You control the ingredients, ensuring a richer, more satisfying flavor. Plus, it's kinda fun, isn't it? It's like being a mad scientist in the kitchen, but instead of creating a monster, you're creating a delicious dessert.
Ingredient | Why It Matters |
|---|---|
Cocoa Powder | Use high-quality cocoa for intense chocolate flavor. |
Buttermilk | Adds moisture and tanginess, creating a tender crumb. |
Oil | Keeps the cake moist and prevents it from drying out. |
When you're baking, don't overbake the cake! A slightly underbaked cake is better than a dry one, especially since we're crumbling it up anyway. Keep an eye on it and test it with a toothpick. If it comes out with a few moist crumbs attached, you're good to go. Let it cool completely before you start crumbling – this is super important! Warm cake is sticky and hard to work with, so patience is key.
Speaking of cooling, I like to wrap my cake in plastic wrap while it's still slightly warm. This traps the moisture and keeps it extra soft. It's a little trick I picked up from my grandma, and it works like a charm every time. Once it's completely cool, you're ready to move on to the next step: crumbling!
Making and Shaping the Chocolate Cake Pops
Making and Shaping the Chocolate Cake Pops
Crumbling the Cake and Mixing the Frosting
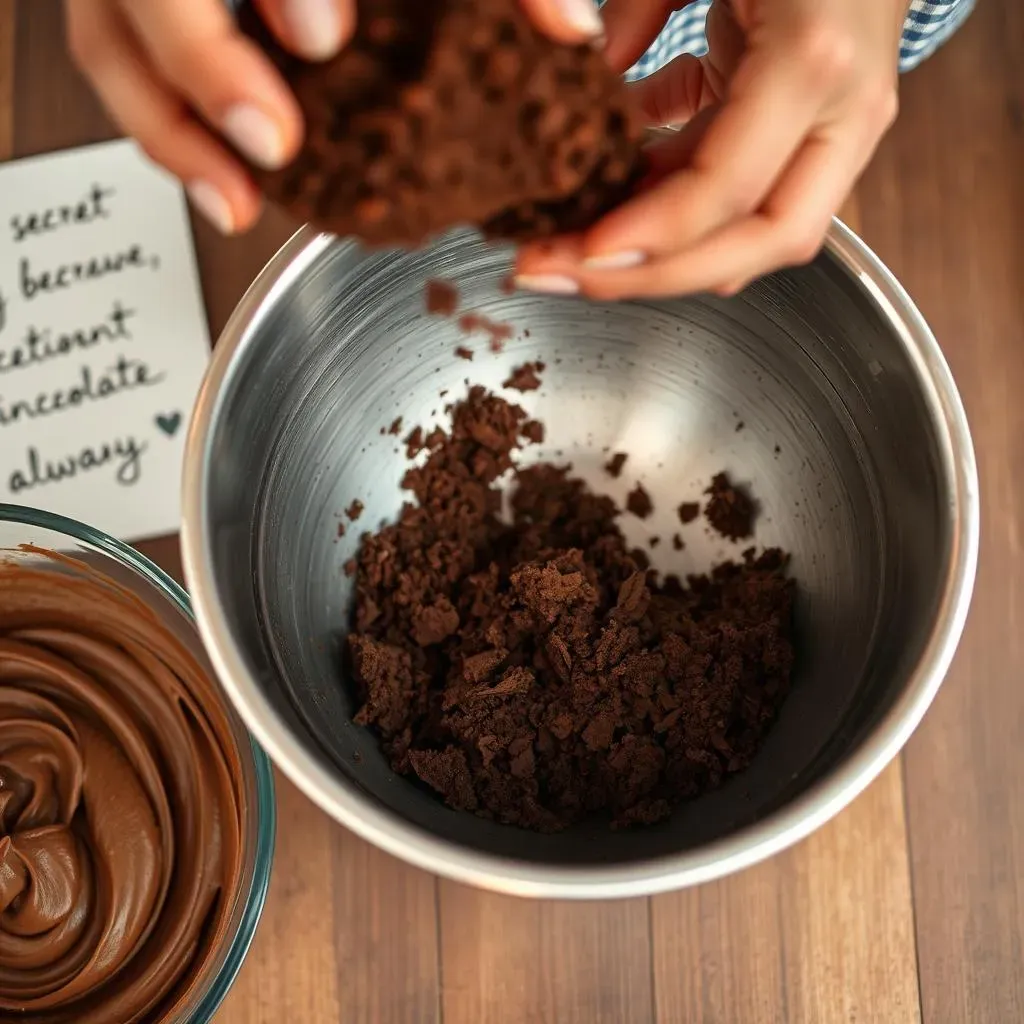
Alright, cake's cooled, now the fun really begins! Time to crumble that chocolate masterpiece. I like to use my hands for this part – it's oddly satisfying. Just break the cake into smaller pieces and then rub them together until you have fine crumbs. You don't want any big chunks lurking in there. Imagine you're making chocolate sand, but tastier.
Next up: the frosting! This is what binds everything together. I usually go for a classic chocolate buttercream, but you can experiment with different flavors. Just make sure it's not too runny, or your cake pops will be a soggy mess. Add the frosting to the cake crumbs gradually, mixing until everything is evenly moistened. You want a consistency that's like playdough – moldable, but not sticky.
"The secret ingredient is always love (and maybe a little extra frosting)." - My Grandma
Rolling and Chilling the Cake Balls
Now comes the shaping! Grab a small cookie scoop or spoon to portion out the cake mixture. This helps keep your cake pops uniform in size. Roll each portion between your palms until you have a smooth, round ball. Don't worry if they're not perfect – a little imperfection adds character!
Once you've rolled all the cake balls, it's time for a chill session. This is crucial! Chilling firms up the cake balls, making them easier to dip and preventing them from falling apart. Pop them in the fridge for at least 30 minutes, or even longer if you have the time. I sometimes stick them in the freezer for a quick chill – just don't forget about them!
Problem | Solution |
|---|---|
Cake balls are too sticky | Add more cake crumbs or chill for longer. |
Cake balls are falling apart | Add more frosting or chill for longer. |
Dipping, Decorating, and Storing Your Chocolate Cake Pops
Dipping, Decorating, and Storing Your Chocolate Cake Pops
Melting the Chocolate and Dipping the Cake Pops
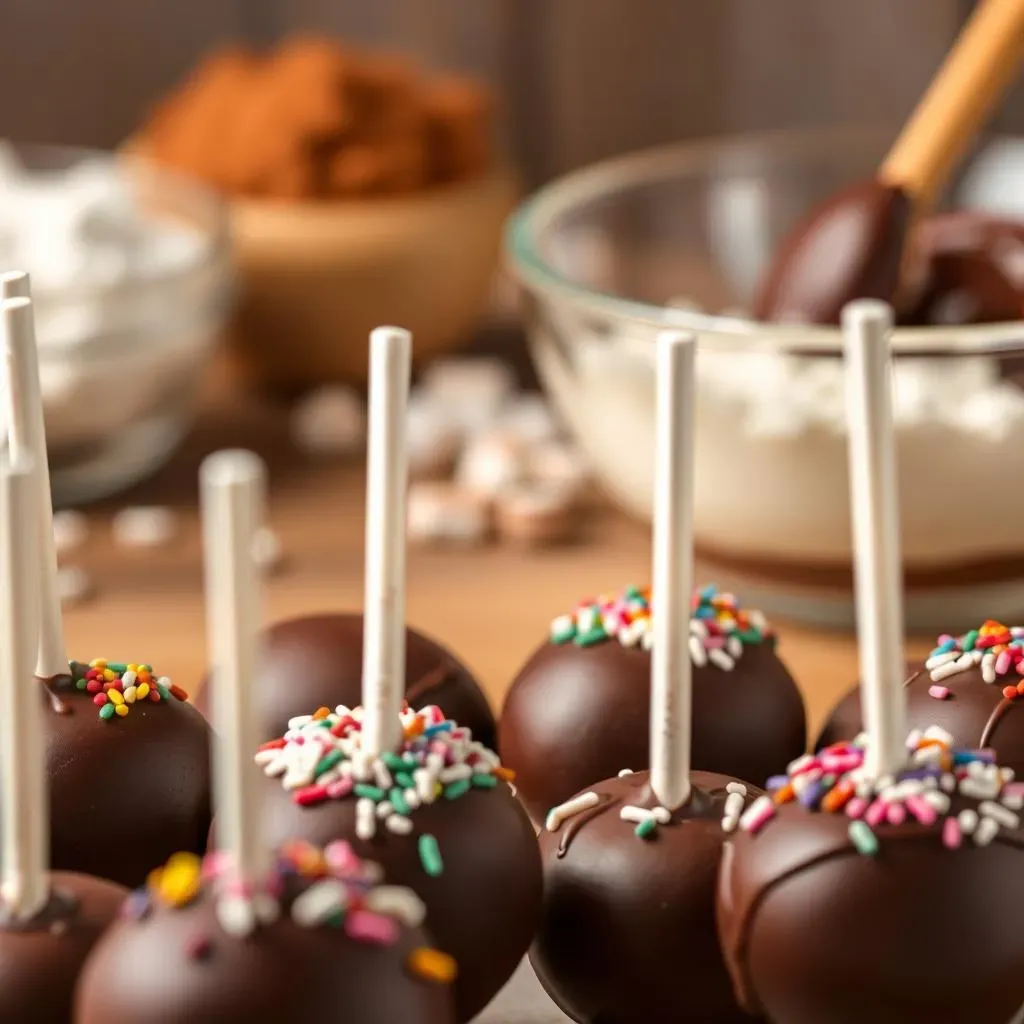
Alright, you've got your chilled cake balls, now for the grand finale: dipping! First, you gotta melt your chocolate. I usually use candy melts because they melt smoothly and come in tons of colors. But you can also use almond bark or semi-sweet chocolate. Just make sure to add a little shortening or coconut oil to help it melt evenly and prevent it from seizing up. Nobody wants chunky, sad-looking chocolate.
Melt the chocolate in a double boiler or in the microwave in short intervals, stirring in between. Once it's melted and smooth, grab your lollipop sticks. Dip the tip of a stick into the melted chocolate and then insert it into a cake ball. This helps the stick adhere to the cake pop. Then, dip the entire cake pop into the melted chocolate, swirling it around to coat it completely. Gently tap off any excess chocolate – you want a smooth, even coating, not a drippy mess.
"Life is like a cake pop: enjoy every dip!" - Unknown
Decorating and Adding Finishing Touches
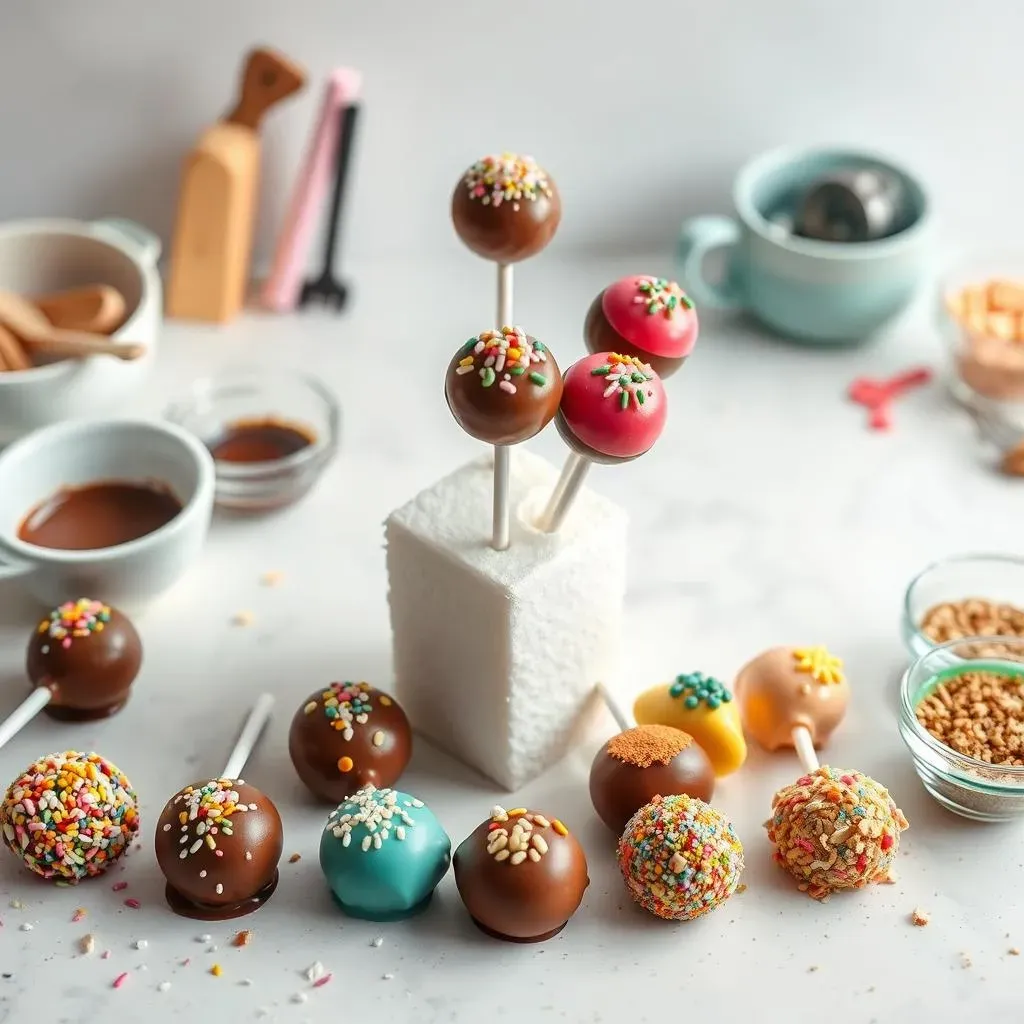
Now for the fun part: decorating! While the chocolate is still wet, sprinkle on your favorite toppings. Sprinkles are a classic, of course, but you can also use chopped nuts, mini chocolate chips, or even edible glitter. Get creative! You can also drizzle melted chocolate of a different color over the cake pops for a fancy effect.
If you're using sprinkles, work quickly, because the chocolate sets fast. If the chocolate starts to harden before you can decorate, just give it a quick re-melt. Once you've decorated your cake pops, stick them into a styrofoam block or cake pop stand to let them dry completely.
Decoration Idea | Description |
|---|---|
Sprinkles | Classic and colorful. |
Chopped Nuts | Adds texture and flavor. |
Edible Glitter | Adds a touch of sparkle. |
Chocolate Drizzle | Elegant and delicious. |
Storing Your Delicious Creations
Once your cake pops are dry, you can store them in an airtight container at room temperature for a few days. Or, you can freeze them for up to 6 weeks. If you're freezing them, wrap each cake pop individually in plastic wrap to prevent freezer burn. When you're ready to eat them, just let them thaw at room temperature for a few minutes.
And that's it! You've made your own homemade chocolate cake pops. Now go forth and share your delicious creations with the world (or just eat them all yourself – I won't judge). Enjoy!
Sweet Endings: Mastering the Chocolate Cake Pop
So, there you have it! You're now equipped to create the best chocolate cake pops imaginable. From baking the cake to that final sprinkle, each step is a chance to add your personal touch. Don't be afraid to experiment with flavors and decorations. Whether you're making these for a party or just a fun afternoon treat, homemade chocolate cake pops are sure to bring a smile to everyone's face. Happy baking!