
Table of Contents
Ever dream of a chocolate cake so good, it makes you want to skip dinner and go straight to dessert? I have, and I've spent years chasing that perfect recipe. Forget dry, crumbly cakes and frosting that tastes like pure sugar. We're talking about a moist, decadent chocolate cake paired with a silky, whipped chocolate buttercream that's so good, you'll want to eat it with a spoon. This isn’t just any cake; it's the "best chocolate cake and frosting recipe," and I'm about to share all my secrets. We'll start by exploring the key ingredients and techniques that make the cake unbelievably moist. Then, we'll move on to crafting the ultimate chocolate buttercream frosting, ensuring it's perfectly balanced and utterly irresistible. After that, I’ll show you how to put it all together and decorate it, followed by some tips and tricks to make sure your cake turns out amazing every single time. Get ready to bake the best chocolate cake you've ever tasted!
The Secret to a Perfect Chocolate Cake: Ingredients and Techniques
The Secret to a Perfect Chocolate Cake: Ingredients and Techniques
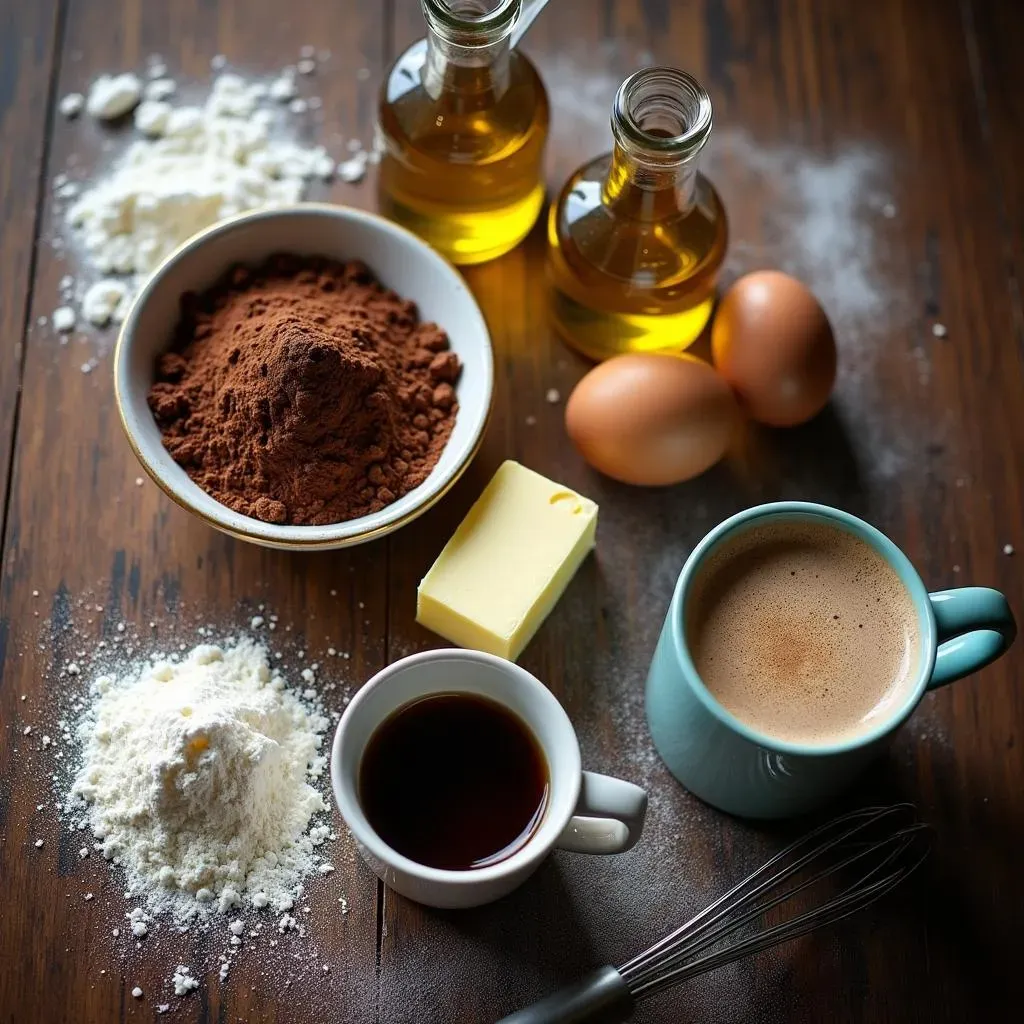
The Foundation: Key Ingredients
let's talk cake. The best chocolate cake isn’t about fancy techniques, it’s about nailing the basics. First up, the ingredients. You need good quality cocoa powder; not the stuff that’s been sitting in the back of your pantry for five years. Think of it like the heart of your cake, the richer the cocoa, the deeper the flavor. Next, don't skimp on the fat. Butter or oil is essential for moisture, and I lean towards oil for super moist results. It’s like adding a tiny raincoat to every crumb. And eggs? They’re not just for binding; they add richness and structure. Think of them as the tiny construction workers of your cake.
The Magic of Wet Ingredients
Now, let's get a little liquid. Buttermilk, or even regular milk with a splash of lemon juice, is a game-changer. It adds a slight tang that balances the sweetness and tenderizes the cake. It's like giving your cake a little spa day. And here's a pro tip: hot coffee or hot water. Yes, hot! It intensifies the chocolate flavor and helps create a super smooth batter. It’s a bit like a secret handshake between the ingredients. Don’t worry, you won’t taste the coffee, just pure, rich chocolate goodness.
Ingredient | Why it's Important |
|---|---|
Good Quality Cocoa Powder | Rich, deep chocolate flavor |
Oil or Butter | Adds moisture |
Eggs | Richness and structure |
Buttermilk or Milk with Lemon Juice | Adds tang and tenderizes |
Hot Coffee or Water | Intensifies chocolate flavor |
Techniques That Matter
Alright, ingredients are sorted, now let's talk technique. Don't overmix your batter, seriously. Overmixing develops the gluten, resulting in a tough cake. Mix until just combined, like you're gently tucking the ingredients into bed. And for even baking, make sure your oven is properly preheated, and don’t open the door while it’s baking. It's like peeking at a surprise party before it starts, it messes everything up. Use the right size pan, and always grease and flour it (or use parchment paper). These small things make a big difference. It’s like making sure your shoes are tied before you start running, it just helps.
Crafting the Ultimate Chocolate Buttercream Frosting
Crafting the Ultimate Chocolate Buttercream Frosting
The Buttercream Basics
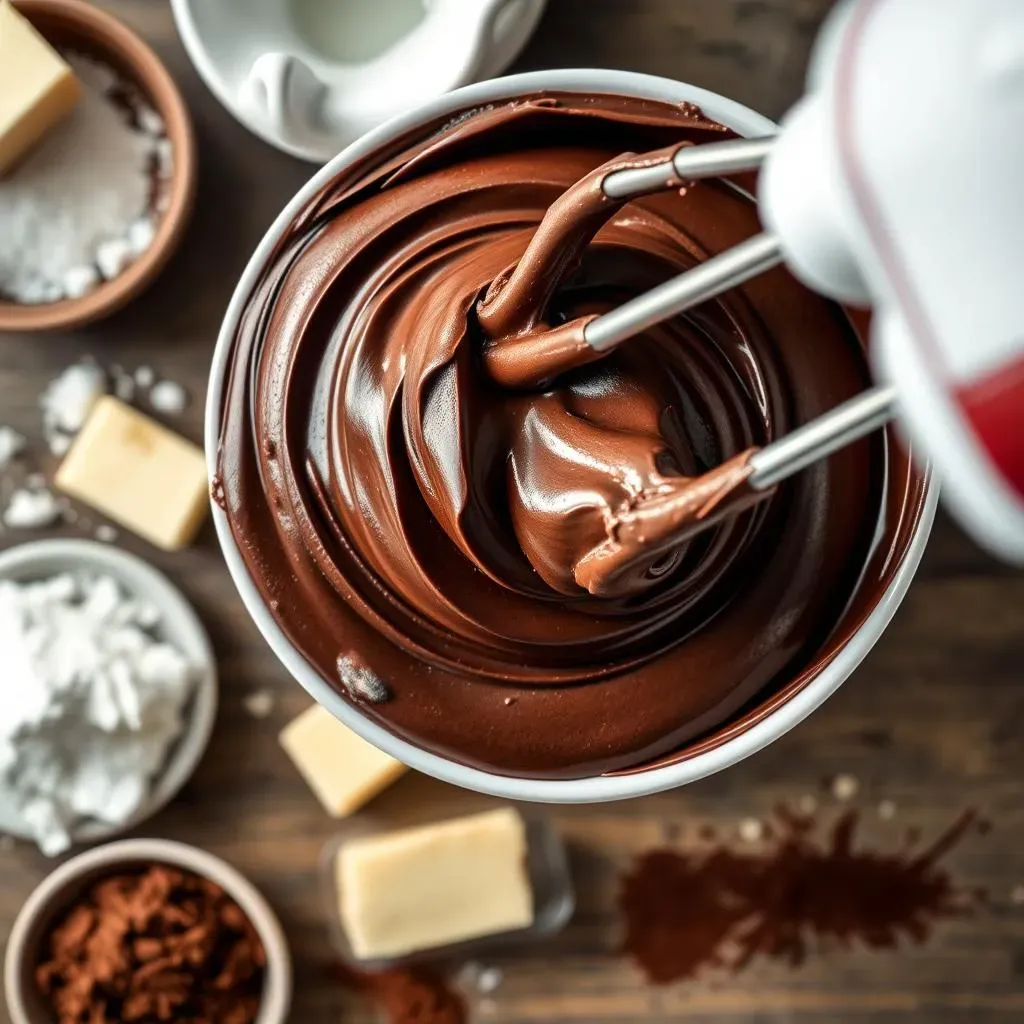
Alright, let's move on to the frosting, the crown jewel of our cake. Forget that grainy, overly sweet stuff you get from the store. We're making a chocolate buttercream that's so smooth, it’s practically velvet. The base is simple: butter, powdered sugar, cocoa powder, and a liquid. But it’s all about the ratios and how you treat your ingredients. First, you need softened butter, not melted, not cold, but perfectly soft. Think of it like playdough, pliable and easy to work with. This is key to achieving that silky texture. And when it comes to powdered sugar, don’t just dump it all in at once, it needs to be added gradually, like you're inviting it to the party slowly.
Chocolate Intensity and Flavor Boosters
Now, for the chocolate punch. Just like with the cake, use good quality cocoa powder. It’s going to make all the difference. And here's a little secret: a pinch of salt. It might sound weird, but it enhances the chocolate flavor and balances the sweetness. It’s like adding a tiny bit of magic dust. For the liquid, you can use milk, cream, or even a bit of coffee for an extra depth of flavor. It’s like choosing the perfect paint thinner for your masterpiece. And vanilla extract, don't forget that, it’s like the last piece of the puzzle that brings everything together, a simple but essential ingredient.
Ingredient | Why it's Important |
|---|---|
Softened Butter | Smooth, silky texture |
Powdered Sugar | Sweetness and structure |
Good Quality Cocoa Powder | Rich chocolate flavor |
Pinch of Salt | Enhances flavor |
Liquid (Milk, Cream, Coffee) | Adjusts consistency |
Vanilla Extract | Adds depth of flavor |
The Whipping Technique
the most important part of this, the whipping process. Start by beating the softened butter until it’s light and fluffy, think of it like you are waking it up. Then, slowly add the powdered sugar, a bit at a time, mixing well after each addition. It's like you're introducing the sugar to the butter, little by little. Once all the sugar is in, add the cocoa powder, salt, liquid, and vanilla extract. Now, beat the frosting on medium speed until it’s light, fluffy, and completely smooth. This is where the magic happens. Don’t rush it, let the mixer do its thing. Scrape down the sides of the bowl often to make sure everything is incorporated and there are no sneaky pockets of sugar hiding out. It’s like you are making sure everyone is invited to the party.
Assembling and Decorating Your Best Chocolate Cake
Assembling and Decorating Your Best Chocolate Cake
The Art of Layering
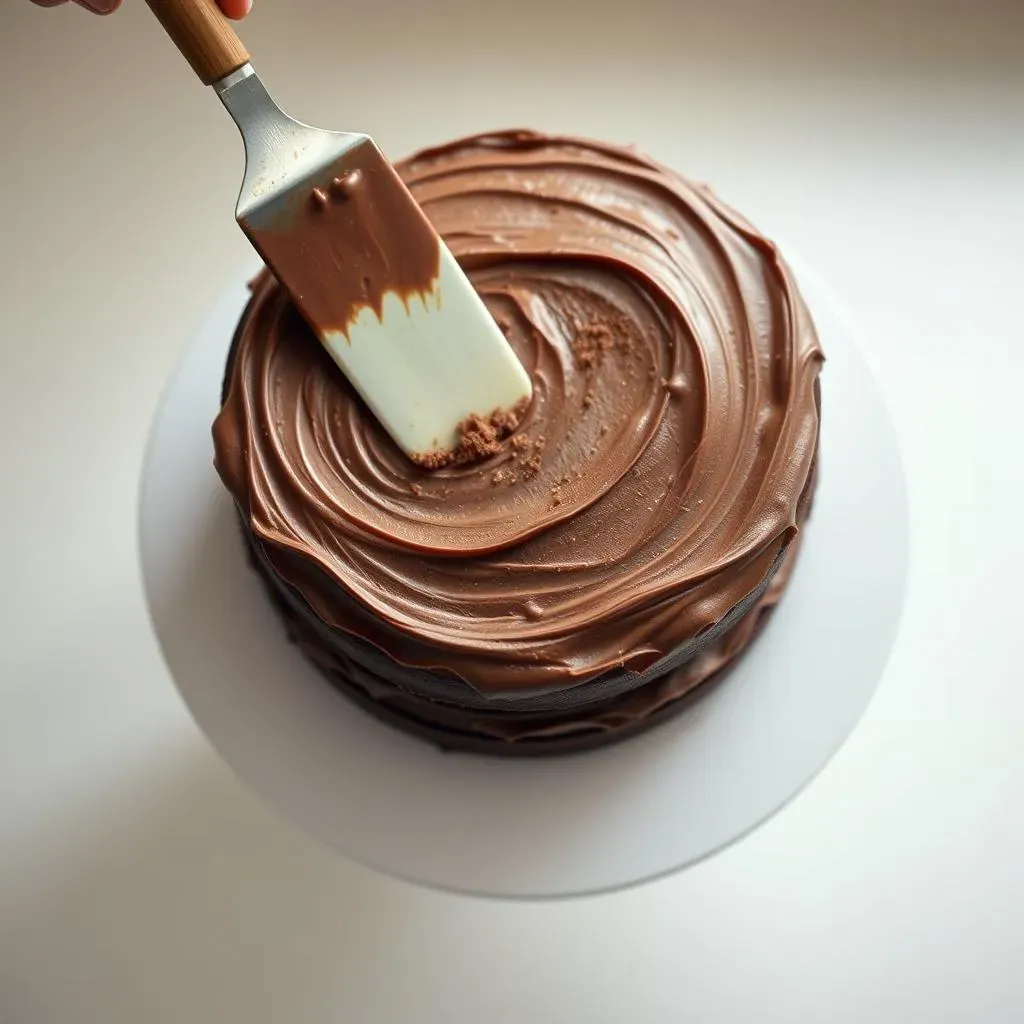
Alright, your cake layers are cooled, your frosting is ready, now comes the fun part: putting it all together. If your cake layers have a domed top, use a long serrated knife to carefully level them. You want a nice flat surface for stacking. It's like preparing a canvas for a masterpiece. Place your first layer on a cake stand or plate. If you want to be extra fancy, put small strips of parchment paper under the edges of the cake to keep your stand clean, it’s like putting on a bib before a messy meal. Now, slather on a generous layer of frosting, don't be stingy, we’re not here to count calories. Use an offset spatula to spread it evenly, like you are smoothing out a bed sheet.
Carefully place the second cake layer on top. If you have more than two layers, keep going, repeat the frosting and layering process. Once all your layers are stacked, apply a thin layer of frosting all over the cake. This is called a crumb coat, and it’s like a primer for your final coat. It's going to trap those loose crumbs and keep them from messing up your final frosting. Put the cake in the fridge for about 15-20 minutes to let the crumb coat set. Think of it like letting the foundation of a building harden before you start adding the walls, it's important to let it set.
Decorating Like a Pro (or Not)
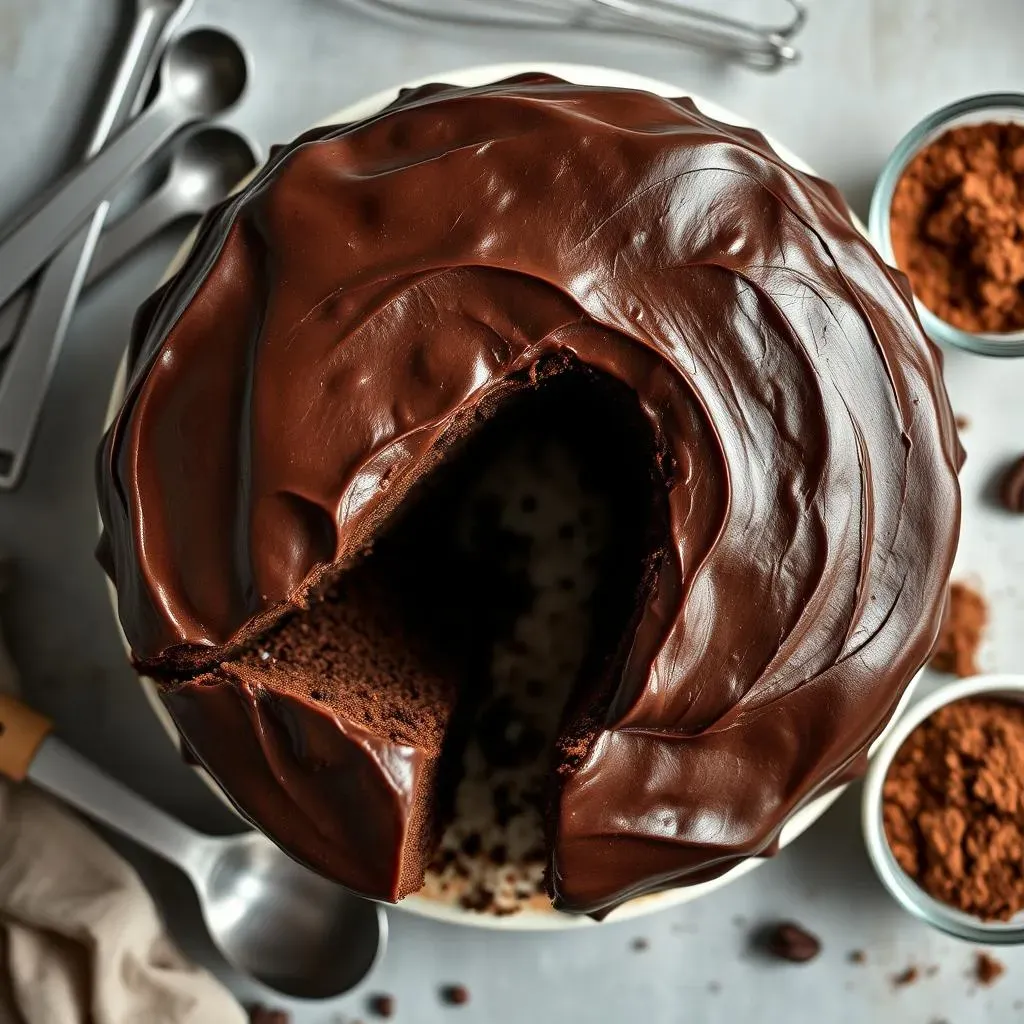
Now, for the final frosting. Apply a generous layer of your beautiful chocolate buttercream all over the cake, making sure it’s nice and smooth. Use your offset spatula to create that smooth finish, it's like you are sculpting a cake, not just frosting it. If you don’t have an offset spatula, the back of a spoon or a butter knife will do. Don't stress about making it perfect, it's a homemade cake, not a museum piece. For decoration, you can keep it simple with a swirl pattern on top, or go all out with chocolate shavings, sprinkles, or fresh berries. It’s like adding the final touches to a painting, the possibilities are endless.
If you are feeling adventurous, try piping some frosting around the edges. Use a piping bag with a star tip for a classic border, or a round tip for simple dots. But don't worry if you're not a piping pro, you can also just use a fork to create some cool patterns. It’s like adding your signature to your work of art. And the most important thing? Have fun with it! It's a cake, after all. It’s meant to be enjoyed and shared, not judged.
Step | Description |
|---|---|
Level Cake Layers | Use a serrated knife to remove any domes |
First Frosting Layer | Apply a generous layer of frosting, spread evenly |
Stack Layers | Carefully place the second layer on top, repeat if needed |
Crumb Coat | Apply a thin layer of frosting, chill for 15-20 minutes |
Final Frosting | Apply a generous layer of frosting, smooth it out |
Decorate | Add chocolate shavings, sprinkles, berries or pipe some frosting |
Tips and Tricks for the Best Chocolate Cake and Frosting Recipe
Tips and Tricks for the Best Chocolate Cake and Frosting Recipe
Cake Baking Wisdom
so you've got the basic recipe down, but let's talk about some extra tips and tricks that can take your cake from good to absolutely amazing. First off, always use room temperature ingredients. It's like making sure everyone's comfortable before the party starts. Room temperature eggs, butter, and milk emulsify better, resulting in a smoother batter and a more even bake. And don't be afraid to experiment with different types of cocoa powder. Dutch-processed cocoa will give you a darker, richer flavor, while natural cocoa has a slightly more acidic taste. It's like choosing the right shade of paint for your masterpiece, it can change the whole feel of it.
Another important thing is to measure your ingredients accurately. Baking is a science, not an art (well, it's a bit of both), so precise measurements are key. Use measuring cups and spoons specifically designed for baking, and don't just eyeball it. And when you're using dry ingredients, like flour and cocoa powder, make sure to spoon them into your measuring cup, don't scoop, or you’ll end up with too much. It’s like calibrating your tools before you start a project, it makes sure everything is just right. And finally, always, always let your cake cool completely before frosting. It’s like letting a hot pan cool before you touch it; you’ll thank me later.
Frosting Finesse
Now, let's talk frosting. If your frosting is too thick, add a tablespoon of milk or cream at a time until it reaches the desired consistency. It's like slowly adding water to paint to get the perfect texture. And if it’s too thin, add a bit more powdered sugar, a tablespoon at a time. It’s like adding more layers of clay to sculpt your pot. And if you find that your frosting is too sweet, a tiny pinch of salt will do the trick. It's like adding a bit of lemon to a lemonade that's too sweet, it balances everything out.
And here's a pro tip: if you want an extra smooth frosting, try using an immersion blender to whip it for a minute or two. It’s like giving your frosting a spa treatment, it's going to become even more smooth and silky. If you want a richer chocolate flavor, melt some chocolate chips and add them to the frosting while it's still warm. And don’t just settle for plain vanilla extract, try using different extracts, like almond or peppermint, for different flavors. It’s like giving your frosting a personality, it will make it unique.
Tip | Why it Matters |
|---|---|
Room Temperature Ingredients | Better emulsification, smoother batter |
Accurate Measurements | Consistent results |
Let Cake Cool Completely | Prevents frosting from melting |
Adjust Frosting Consistency | Add liquid or powdered sugar as needed |
Use Immersion Blender | Extra smooth frosting |
Experiment with Extracts and Flavors | Unique flavors |
Wrapping Up: Your Best Chocolate Cake Awaits
So, there you have it – the secrets to creating what I truly believe is the best chocolate cake and frosting recipe. From understanding the importance of quality cocoa to mastering the art of a perfect buttercream, each step is designed to ensure your cake is a showstopper. It's not just about following instructions; it's about the joy of creating something delicious and sharing it with others. Whether it’s a birthday, a celebration, or just a regular Tuesday that needs a little chocolate, this recipe is your go-to. Don't be afraid to experiment, make it your own, and most importantly, enjoy every bite. Now, go bake that cake and make some memories!