
Table of Contents
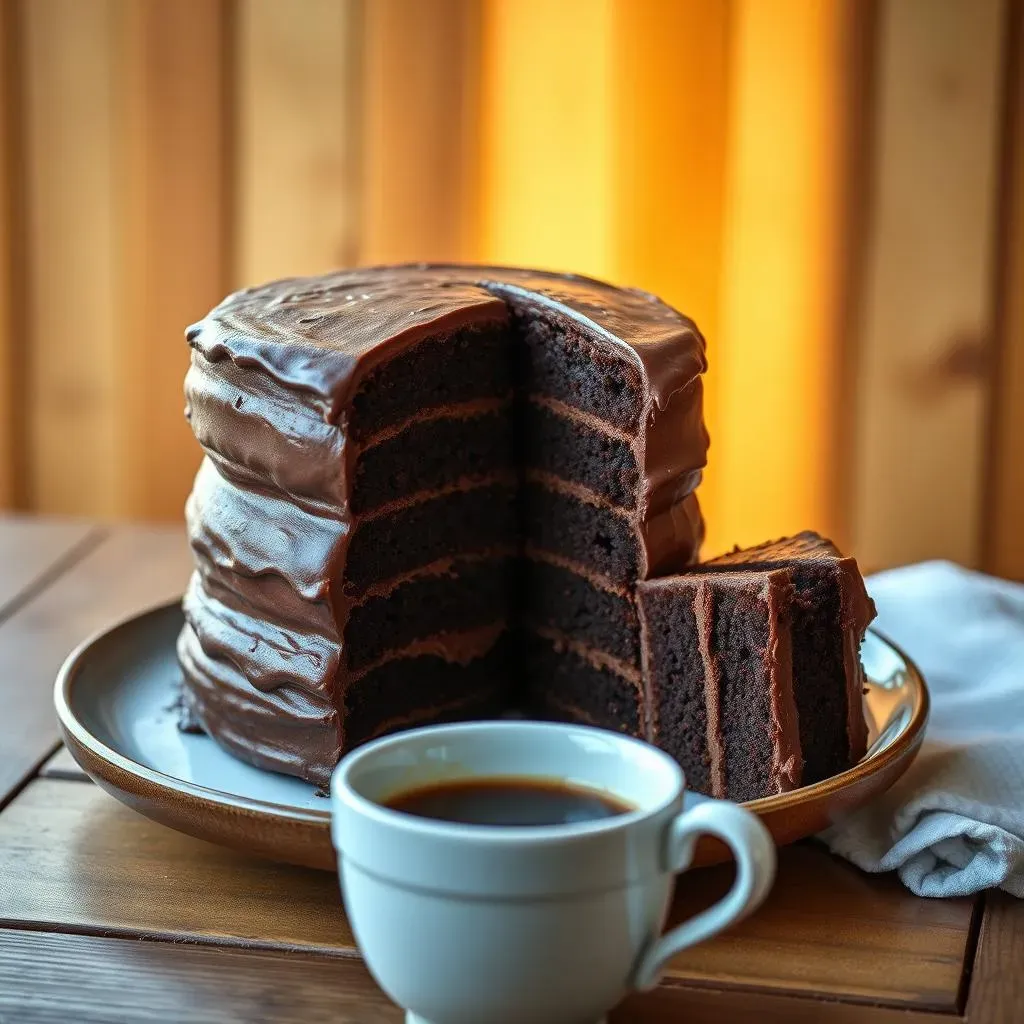
Ever dreamed of a cake that's not just delicious, but a true spectacle? I have, and that's how I became obsessed with the 7 layer chocolate cake recipe. It's more than just a dessert; it's a baking adventure, a culinary feat that looks as impressive as it tastes. Forget those boring, single-layer cakes; we're going for sky-high deliciousness! This isn't just some recipe dump, we're going on a journey, first, we'll uncover the history behind this layered marvel, exploring its roots and connections to other classic cakes. Then, I'll walk you through the process of creating those perfectly thin cake layers, no over-baking disasters here. Next, we’ll dive into the luscious chocolate fudge frosting, the glue that holds this masterpiece together. Finally, I will show you the assembly process, we'll put it all together and make it look as good as it tastes, and then we'll explore options for customizations and troubleshoot common issues. So, grab your apron, preheat your oven, and let's make a 7 layer chocolate cake that'll have everyone asking for seconds (and the recipe!).
The Story Behind the Layers: A History of the 7 Layer Chocolate Cake
The Story Behind the Layers: A History of the 7 Layer Chocolate Cake
so you're probably thinking, "Seven layers? Why not eight?" I get it. But there's something special about this number, and it's not just some random choice. The 7 layer chocolate cake, with its thin, delicate layers and rich fudge frosting, has some serious roots. It's often compared to the Smith Island Cake, which is the official state dessert of Maryland, and that cake is packed with layers, sometimes even more than seven. This cake is a testament to home baking and the love that goes into creating something so special, and it's not something you just whip up on a Tuesday night. It’s a labor of love, a treat usually reserved for celebrations, and that's what makes it so memorable. The history of the 7 layer chocolate cake is a bit murky, like trying to trace the origins of a family recipe passed down through generations, but one thing is clear: it's a tradition worth keeping alive.
Baking Like a Pro: Mastering the Thin Cake Layers for Your 7 Layer Chocolate Cake
Baking Like a Pro: Mastering the Thin Cake Layers for Your 7 Layer Chocolate Cake
The Thin Layer Secret
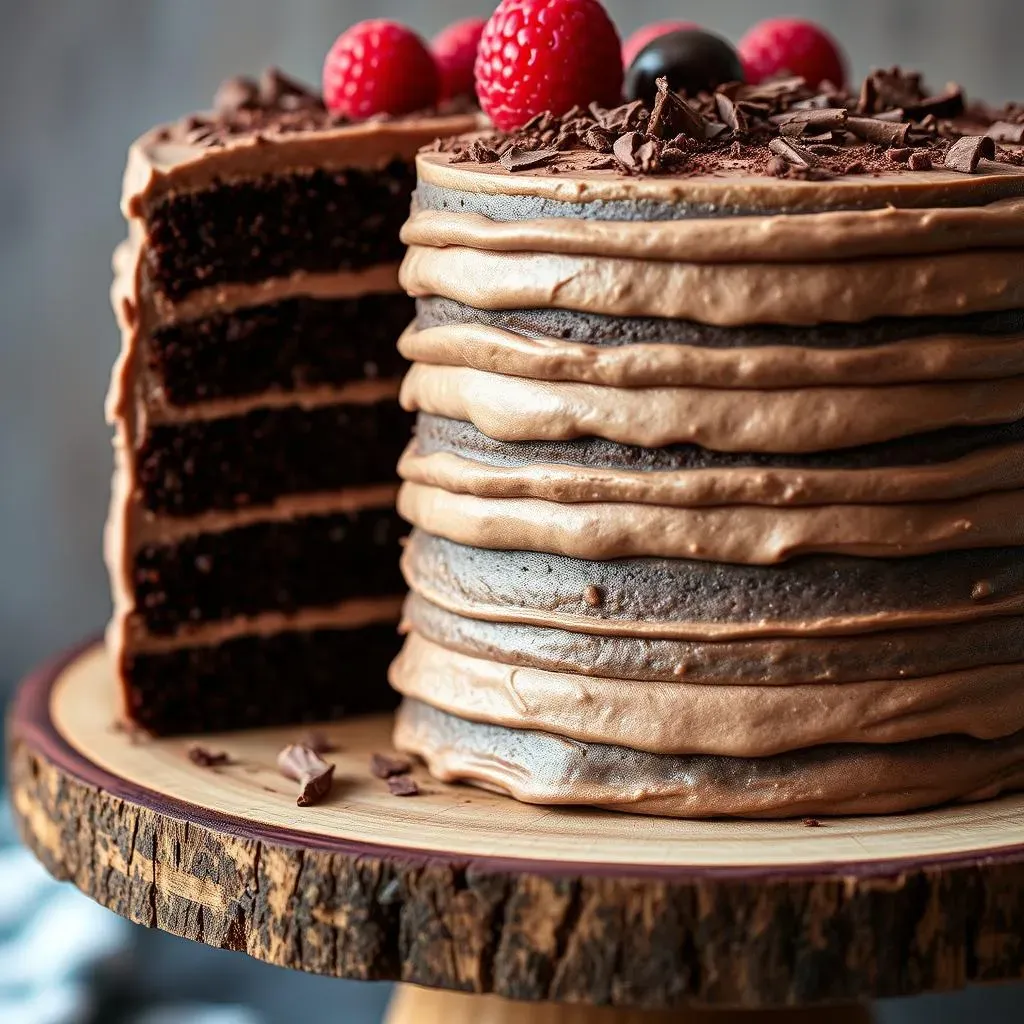
Alright, let's talk about those thin layers, the real stars of the 7 layer chocolate cake. It's not about making one big cake and then slicing it into sad, uneven pieces. No, no, we're baking each layer individually, and that's what makes this recipe a bit of a project, but I promise, it's worth it. The key here is to use multiple cake tins. If you only have one or two, you can still do it, but it will take longer, and you'll have to reuse them, just make sure they cool a bit before adding more batter. The goal is to get each layer as thin and even as possible, so don’t overfill the tins, it's better to do a couple of batches than to have uneven, thick layers.
Also, don't overbake them! We're not going for a fluffy, moist cake here. These layers need to be firm enough to stack, so keep a close eye on them. A good way to know when they're ready is when the edges start to pull away from the pan, and a toothpick inserted in the center comes out clean. It's a delicate balance, but once you get the hang of it, you'll be churning out perfect layers like a pro. I remember the first time I tried this, my layers were all different sizes and shapes, and it was a hot mess. Don't be me, learn from my mistakes!
Tips for Perfect Layers
so you've got your tins ready, and you're feeling confident. Here are a few extra tips that helped me get consistent results. First, use parchment paper! It’s a lifesaver, It will prevent the layers from sticking to the bottom of the tin, and it makes them super easy to remove. Cut out circles that fit the bottom of your tins, and just lay them in, no need to grease them, if you are using a non-stick pan. Another trick is to use a scale to measure the batter for each layer. This will ensure that each layer is the same thickness, and it will prevent them from being wonky. It might seem like a lot of fuss, but it really makes a difference in the end.
Also, don’t be afraid to rotate your tins halfway through baking, so they bake evenly. Some ovens have hot spots, and this will help ensure that your layers are all the same color. And finally, let the layers cool completely before frosting. Warm layers + frosting = a melty mess, trust me on this one. I once tried to frost a still-warm cake, and it was like trying to ice a slippery slide; the frosting was everywhere but where it was supposed to be. Let them cool, patience is a virtue when it comes to baking this cake.
Tip | Why It Matters |
|---|---|
Use Parchment Paper | Prevents sticking, easy removal |
Measure Batter | Ensures even layer thickness |
Rotate Pans | Even baking, no hot spots |
Cool Completely | Prevents melty mess when frosting |
Fudge Frosting Magic: The Secret to a Perfect 7 Layer Chocolate Cake
Fudge Frosting Magic: The Secret to a Perfect 7 Layer Chocolate Cake
The Importance of a Good Frosting
let's be real, the frosting is just as important as the cake layers, maybe even more so. The 7 layer chocolate cake isn't just about cake; it's about the perfect balance of cake and frosting, like a delicious, edible sandwich. We're not talking about some thin, sugary glaze here. We need a rich, decadent, fudge frosting that's thick enough to hold the layers together but still spreadable. It's the glue that binds the cake, and it's what makes each bite a symphony of textures and flavors. A bad frosting can ruin even the most perfect cake layers. I’ve seen it, and it's a tragedy. So, let’s nail this frosting.
The type of frosting we're making here isn't your everyday buttercream. This is a cooked fudge frosting, which means it requires a bit of extra attention, mainly, a candy thermometer. Don’t let that scare you; it’s not as intimidating as it sounds. The candy thermometer will help you achieve the right consistency. The goal is to cook the frosting to the soft-ball stage, which is around 230°F (110°C). This ensures that it's thick enough to hold its shape but still soft enough to spread easily. If you skip this step or don't cook it enough, you could end up with a runny, thin mess, and trust me, that's not the kind of magic we're going for.
Making the Fudge Frosting
Alright, so you've got your candy thermometer ready, let's get to it. The recipe will usually call for a mix of butter, sugar, cocoa powder, milk, and maybe some chocolate chips for extra richness. It's a bit like making a fancy chocolate sauce, but we're cooking it to a specific temperature. You’ll need to stir it constantly while it’s cooking, so it doesn’t burn on the bottom, and you should keep a close eye on that thermometer. Once it reaches 230°F, take it off the heat. The frosting will continue to thicken as it cools, so don’t panic if it seems a bit runny at first, it's all part of the process.
Once it’s off the heat, you can add a splash of vanilla extract, or even a pinch of salt to enhance the chocolate flavor. The key here is to let it cool down slightly before trying to spread it on the cake, otherwise, it will melt the layers and be a nightmare to work with. I’ve learned this the hard way, more than once. It's like trying to paint a wall with a water hose; it is not going to work. Let it cool down, patience is key, and remember, the goal is a smooth, spreadable frosting that's not too runny or too hard.
Ingredient | Why It's Important |
|---|---|
Butter | Adds richness, helps with texture |
Sugar | Sweetness and structure |
Cocoa Powder | Chocolate flavor, depth |
Milk | Moisture, helps with consistency |
Chocolate Chips | Added richness and flavor |
Vanilla Extract | Enhances flavor |
Spreading the Frosting
Now that the frosting is at the right temperature and consistency, it's time to spread it on the cake layers, and this is where things can get a bit tricky. You need to work quickly because the frosting will start to set as it cools, and it will become harder to spread. Have all your layers ready and cooled. Use an offset spatula, it's your best friend when it comes to frosting a cake. Start with a generous amount of frosting on the first layer, spreading it evenly and making sure to get it all the way to the edges, and don't be stingy with the frosting; each layer needs to be well covered. Gently place the second layer on top, and repeat the process, layer by layer until you've got the entire cake assembled.
The goal is to get each layer as even as possible, so take your time and don't rush it. If the frosting starts to get too hard to spread, you can gently warm it up again, but be careful not to overheat it or it will become runny. Once the cake is assembled, you can use the remaining frosting to cover the sides, creating a smooth finish. You can get creative with the frosting; you can do swirls, or just keep it simple and clean. It's your cake, so do whatever makes you happy. Remember, the frosting is the final touch, so make it count. I like to think of it as the icing on the cake, literally.
Assembling Your Masterpiece: Creating a Stunning 7 Layer Chocolate Cake
Assembling Your Masterpiece: Creating a Stunning 7 Layer Chocolate Cake
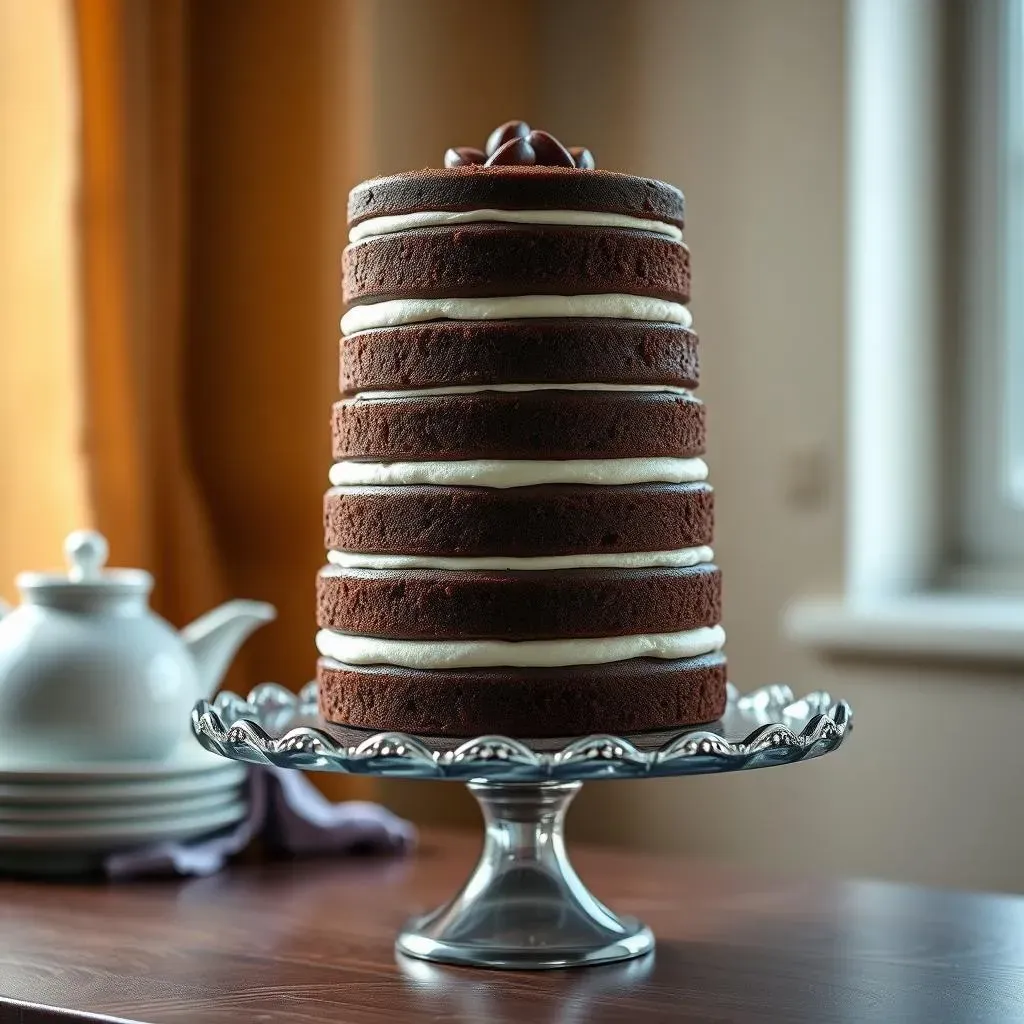
Layering Like a Pro
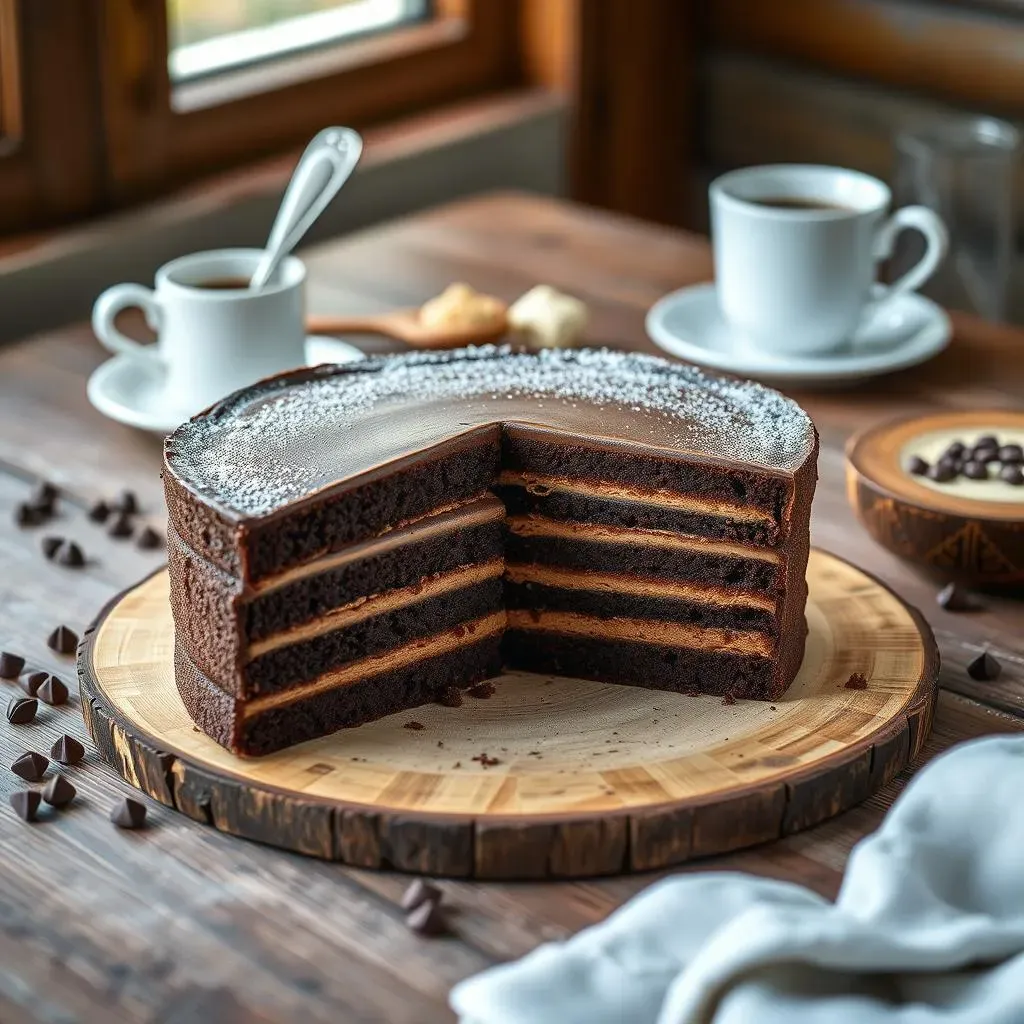
so you've got your cake layers cooled, your frosting is ready, and now it's time for the fun part: assembly! This is where your 7 layer chocolate cake really starts to come to life. It's like building a delicious tower, but instead of bricks, we're using cake and frosting. The key here is to work on a flat surface, and make sure you have enough space. Have your cake stand or plate ready, and take a deep breath. This is your masterpiece, so take your time and enjoy the process. It's not a race, it's a creative journey. I like to think of it as a delicious art project, and you're the artist.
Start by placing the first cake layer on your cake stand or plate. Make sure it's centered, and then grab your frosting. Using an offset spatula, spread a generous, even layer of frosting over the first cake layer, and don't be shy, every layer needs a good amount of frosting. Carefully place the second cake layer on top of the frosting, and gently press it down, not too hard, you don't want to squish the cake. Repeat the process, layer by layer, until you've used all your cake layers. With each layer, you’re one step closer to cake heaven, and it's so satisfying to see it all come together. It's like watching a flower bloom, but instead of petals, we have cake and frosting.
Finishing Touches
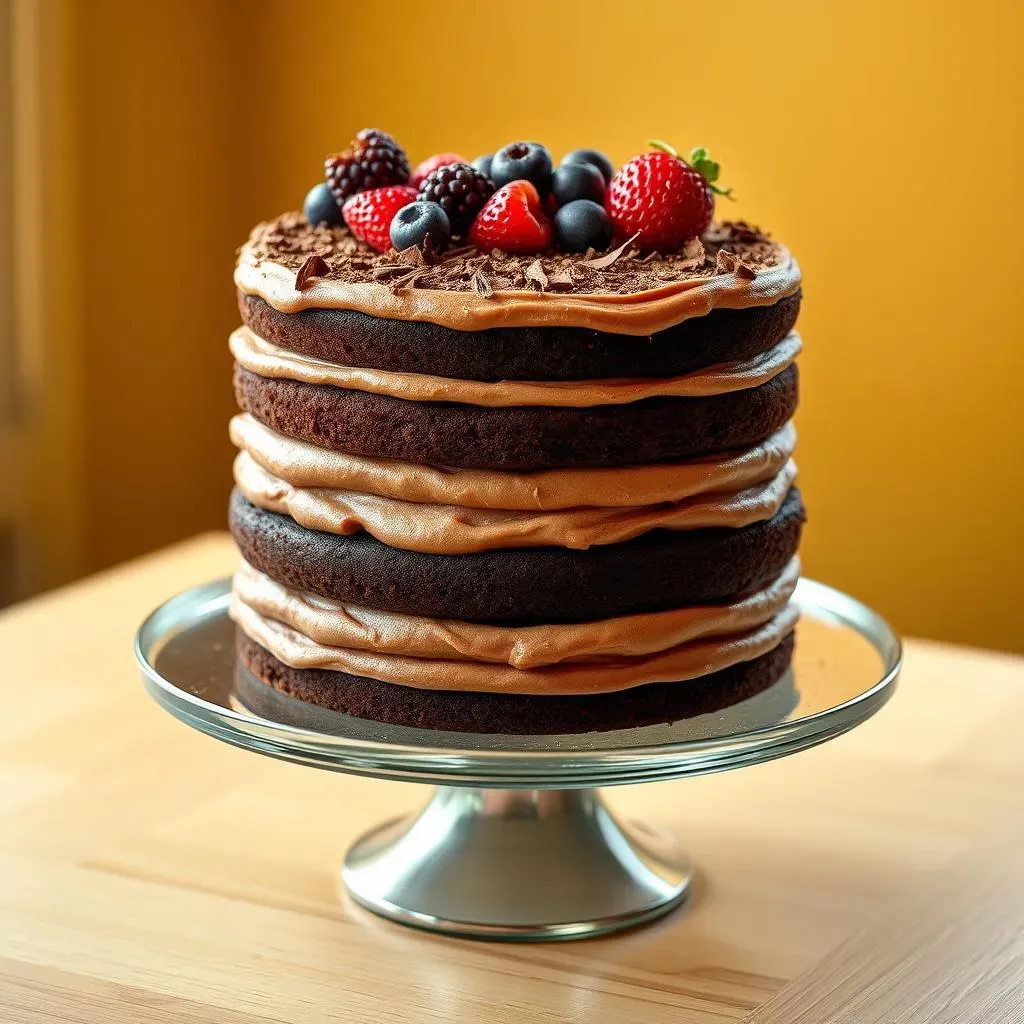
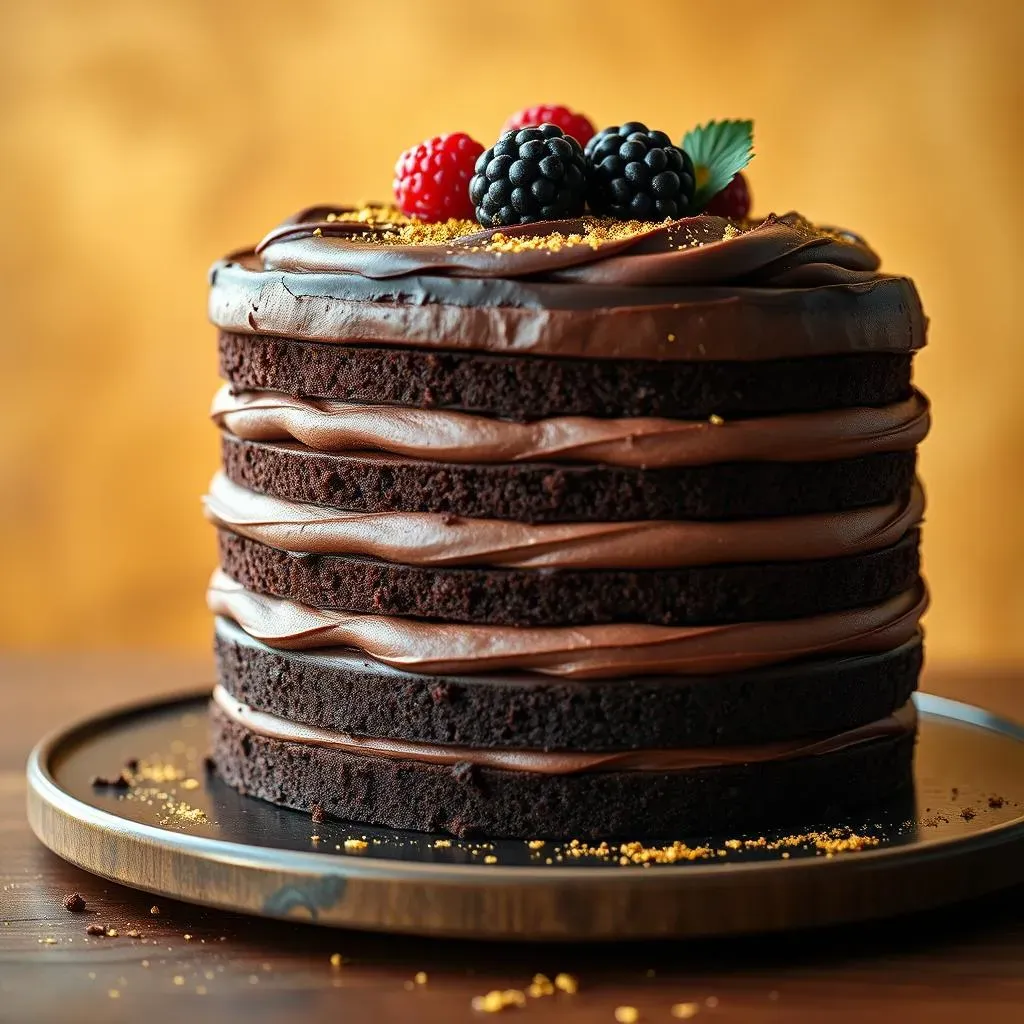
Once you've got all seven layers stacked, it's time for the final frosting. Use the remaining frosting to cover the sides of the cake, creating a smooth and even finish. You can use your offset spatula to smooth it out, or you can use a cake scraper for a more professional look. It's all about personal preference, and you can get creative with it. I've seen people do everything from smooth, clean lines to textured swirls. It's your cake, so do whatever makes you happy. The goal is to make it look as good as it tastes.
Now, for the fun part: decorations! You can keep it simple with a dusting of cocoa powder or some chocolate shavings, or you can get fancy with chocolate curls, fresh berries, or even some edible flowers. The sky's the limit, and it’s your chance to make the cake truly yours. I once added some gold edible glitter to one of my cakes, and it was a huge hit. It's all about adding those little touches that make it special, and it's the perfect way to end this baking adventure. Remember, the goal is to make a cake that's not only delicious but also a feast for the eyes.
Step | Action | Tips |
|---|---|---|
Layer 1 | Place on cake stand | Make sure it's centered |
Frosting | Spread evenly | Use a generous amount |
Layer 2-7 | Place on top of frosting | Gently press down |
Final Frosting | Cover sides | Smooth it out with spatula or scraper |
Decorate | Add finishing touches | Get creative! |
Customizing Your Cake: Options and Alternatives for the 7 Layer Chocolate Cake Recipe
Customizing Your Cake: Options and Alternatives for the 7 Layer Chocolate Cake Recipe
Chocolate Variations
so you've mastered the basic 7 layer chocolate cake recipe, and now you're feeling adventurous, right? Let's talk about ways to switch things up with chocolate. The original recipe usually calls for cocoa powder and maybe some chocolate chips, but don't let that limit you. You can use different types of chocolate to add a twist, like dark chocolate for a more intense flavor, milk chocolate for a sweeter touch, or even white chocolate for a creamy, dreamy alternative. You could even do a mix of different chocolates, like a layer of dark chocolate frosting, a layer of milk chocolate, and so on. It's like a chocolate rainbow, but in cake form. I once made a cake with all three types of chocolate, and it was a chocolate lover's dream. It's all about experimenting and finding what you like best.
Another idea is to use different types of cocoa powder. Dutch-processed cocoa powder will give you a darker, richer flavor, while natural cocoa powder will be a bit more acidic. You can also try adding some instant espresso powder to the frosting to enhance the chocolate flavor, it’s a game changer. The possibilities are endless, and it’s all about making the cake your own. Don't be afraid to think outside the box, or the cake pan, in this case. The world is your chocolate oyster, go for it. Just make sure you don't add too much liquid, or your frosting won't set properly, that would be a disaster.
Cake Layer Swaps
Now, let's talk about the cake layers themselves. While the classic 7 layer chocolate cake is made with vanilla cake, you can definitely play around with different flavors. You could use a chocolate cake recipe for the layers, making it a double chocolate dream. Or, you can try a red velvet cake for a touch of elegance, or even a spice cake for a cozy, autumnal twist. I once made a cake with a layer of vanilla, a layer of chocolate, and a layer of red velvet, and it was a hit. It's like a party in your mouth, with a little something for everyone. It's also a great way to use up leftover cake batter if you have some.
You can also add some mix-ins to the cake layers, like chocolate chips, nuts, or even some sprinkles. It's all about adding your own personal touch, and making it unique. Just make sure you don't add too much, or it will mess with the texture of the layers. Also, if you're feeling really adventurous, you can try making different colored layers, using food coloring. It will look like a rainbow when you cut into it, and it’s a great way to impress your friends. Just be careful with food coloring, a little goes a long way. I've learned this the hard way, when I made a cake that was so bright, it looked like it was glowing in the dark. It tasted great, though.
Customization | Description |
|---|---|
Dark Chocolate | Intense, rich flavor |
Milk Chocolate | Sweeter, classic taste |
White Chocolate | Creamy, mild flavor |
Chocolate Cake Layers | Double chocolate delight |
Red Velvet Cake Layers | Elegant, tangy twist |
Spice Cake Layers | Warm, autumnal flavor |
Size and Shape Variations
Finally, let's talk about size and shape. The 7 layer chocolate cake is usually made in a round cake pan, but you're not limited to that. You can make a square cake, a rectangular cake, or even individual mini cakes. It all depends on your preference and what you're going for. If you're making individual cakes, you'll need to adjust the baking time accordingly. Mini cakes are great for parties, or just when you want a little something sweet without making a whole cake. I once made mini cakes in heart-shaped molds, and they were adorable. It’s all about having fun and making it your own.
You can also adjust the number of layers. If you want a taller cake, you can add more layers. If you want a smaller cake, you can use fewer layers. It's all about experimenting and finding what works best for you. Just remember that the more layers you add, the more frosting you'll need. I once made a 10 layer cake, and it was so tall, it was almost impossible to cut. It was a bit of a challenge, but a fun one. It's all about pushing the boundaries and seeing what you can create. So, go ahead, get creative, and make the 7 layer chocolate cake of your dreams.
Troubleshooting and Tips: Common Issues with the 7 Layer Chocolate Cake Recipe
Troubleshooting and Tips: Common Issues with the 7 Layer Chocolate Cake Recipe
Cake Layers Sticking to the Tin
so you've baked your layers, and they look perfect, but then you try to take them out of the tin, and disaster strikes! They're stuck, and it's like a cakey prison break gone wrong. This is a common problem, and it can be super frustrating. The main culprit here is usually not enough grease or the lack of parchment paper. I know I've mentioned it before, but seriously, parchment paper is a lifesaver. It's like a non-stick force field for your cake layers. If you forgot the parchment paper, and your layers are stuck, don't panic! Try gently running a thin knife or spatula around the edges of the tin to loosen them, and then try to flip them out. Sometimes, a little bit of patience and a gentle touch is all you need. I've had my share of cake layers that refused to leave their tin, so I feel you, it’s not fun.
Another reason your layers might be sticking is that they're not fully cooled. Warm cake layers are like little glue traps, they're soft and sticky. Always let your cake layers cool completely in the tins before attempting to remove them. I usually let them sit for at least 15-20 minutes before I even think about taking them out. If they're still being stubborn, you can try placing the tin in the freezer for a few minutes, the cold will help the cake shrink slightly, making it easier to remove. It's like giving your cake a little spa treatment before it's ready for the frosting. I know, it sounds weird, but trust me, it works. And if all else fails, well, you can always try to salvage what you can and bake another layer. It’s all part of the baking adventure, right?
Problem | Solution |
|---|---|
Layers sticking to tin | Use parchment paper, grease tins well |
Layers sticking to tin | Let cake cool completely before removing |
Layers sticking to tin | Try freezing the tin for a few minutes |
Frosting Solidifying Too Quickly
Alright, let's talk about the frosting, because it can be a bit of a diva. You’ve cooked it to the perfect temperature, and it looks great in the pot, but then you start spreading it, and it’s like it turned into cement on you. This is because the frosting is sensitive to temperature changes, and it starts to set as it cools. The key here is to work quickly, and have everything ready before you start frosting. Don’t wait for too long to start assembling the cake layers. If the frosting does start to get too hard to spread, you can gently warm it up again, but be careful not to overheat it, or it will become runny, and that's not what we want. I usually place the frosting back on a low heat, and stir constantly. You can also add a tiny bit of milk or cream to loosen it up, but be very careful not to add too much, or it will ruin the consistency.
Another thing to consider is the weather! If it's a hot and humid day, your frosting will set faster, so you might need to work even quicker. And if you're working in a cold kitchen, the frosting might get too hard, so you might need to warm it up more often. It’s like trying to control the weather, but for your frosting. Also, don’t get discouraged if your frosting isn’t perfect, remember, it's all about practice, and even the most seasoned bakers have frosting mishaps. I once had a frosting that was so hard, I could have used it to build a house. It’s all about learning from your mistakes, and making each cake a little bit better than the last. It’s a journey, not a race.
- Work quickly when spreading frosting.
- Warm up frosting gently if it gets too hard.
- Add a tiny bit of milk or cream to loosen frosting.
- Consider the weather when working with frosting.
The Sweet Finale: Your 7 Layer Chocolate Cake Success
And there you have it, a magnificent 7 layer chocolate cake, baked by you! It may seem like a challenge at first, but with a little patience and some practice, you can create a cake that not only tastes amazing, but looks like it came straight from a professional bakery. Remember, the key is in the thin layers, the perfect frosting consistency, and a swift assembly. Don't worry if your first attempt isn't perfect; even the most seasoned bakers have their off days. The most important thing is to enjoy the process, and of course, the delicious end result. So go ahead, share your creation, and bask in the glory of your baking achievement. You've earned it!